Monday 16 October 2017

Photoblog: Iceland


Poking out of the gulf stream in the North Atlantic is Iceland, an island country with such varied terrrain that it provides a wonderland for photographers. This September, I spent a week travelling mostly around the southern part of the island, and would like to share some thoughts on what it’s like to travel and photograph there.

First of all, a note about Icelandic seasons. I was forewarned that September is a time of transition, weatherwise. Regardless, I thought it the best time for me to go, because I needed some dark skies if I was going to see the Aurora Borealis. It takes a while for the glow of the sun to disappear in the evening, though, because the sun doesn’t go very far below the horizon at that time of year.
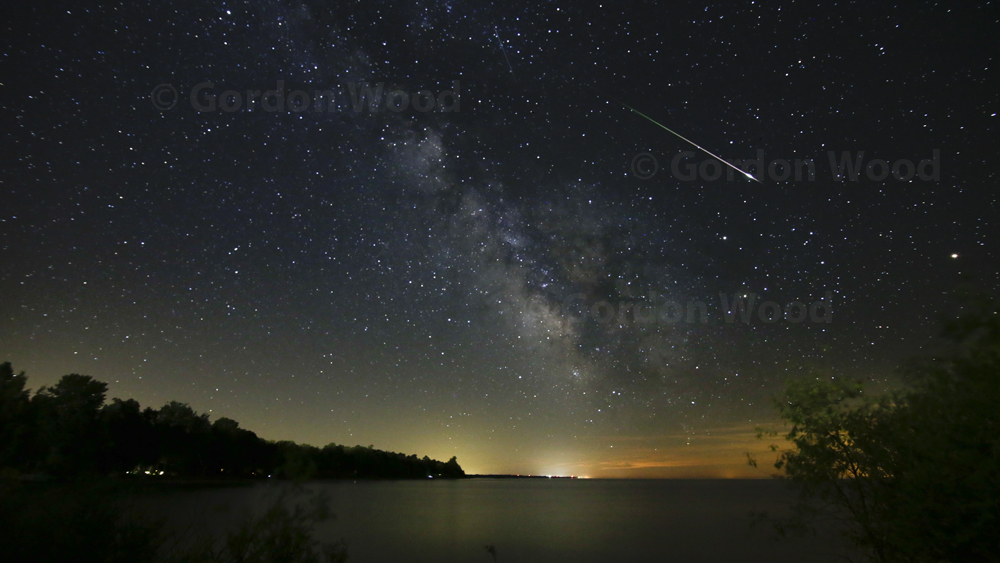
Glimpse of the Northern Lights at Budir

The reality, however, was that the entire week was forecast at or nearly 100% chance of rain, and did it deliver! Only one evening was relatively clear and pleasant, but rain was forecast to roll back in later. That gave me only a narrow window to catch a glimpse of the northern lights, but it was somewhat weak at that time in the evening. Bottom line –for night skies, go in fall, winter or early spring, but expect to be shut out by the weather.

In order to see the variety of volcanoes, icebergs, black sand beaches and ocean wildlife that Iceland offers, you’re better off renting a car than taking a bus trip. Highway 1 is the ring road that encircles the entire country, and is well maintained. From there, a number of major and secondary (ie. rough gravel) roads go inland. Some roads are closed in winter as they become treacherous or unpassable.

One thing to keep in mind is that there are long stretches along the ring road where nary a gas station can be seen. Filling the tank and grabbing snacks should be done at every opportunity.

Speaking of snacks, or food in general, be prepared for sticker shock when in Iceland. A typical simple meal, such as burger and fries is going to set you back $20-$25. All of the guesthouses I stayed at that included a breakfast in the price provided a generous buffet each morning. If you fill up on breakfast, you can probably save some money at lunchtime by getting by with a prepackaged sandwich at a gas station.

My rental Skoda Octavia
Gas pumps at chain stations like N1 are generally pay-at-the-pump types, as in Canada. There are some notable differences, however. The first time I re-fuelled, I made the mistake of selecting ‘fill tank’ rather than the fixed authorized amounts. That evening, I checked my Visa statement. To my horror, a pre-authorized amount of $298 CDN appeared. I phoned N1 the next morning, and I was told that choosing ‘fill tank’ automatically results in a 25,000 ISK (Icelandic kroner) authorization. I was assured that this amount would disappear and the true amount would be posted to my account, which it eventually did.

Another oddity is that the pump doesn’t automatically print you a receipt. You have to insert your credit card again or you will have no record of the transaction. Some pumps also refuse to allow transactions from some bank-issued cards, so take several with you. And, as with food, be prepared to pay double for gas.

If you have an unlocked cell phone, you might also consider buying a SIM card. I purchased a Vodaphone Premium Starter Pack on the Icelandair flight for about $35 CDN. This gives you 2 GB of data, 50 minutes of overseas calls and unlimited talk and text within Iceland. I found coverage to be excellent on my travels. Emergency services in Iceland, by the way, can be reached at 112.

My Photographic Destinations
Still on the subject of driving: they drive on the right hand side, but when in cities with traffic lights, remember that you cannot make a right turn on a red light. Luckily, a cop wasn’t behind me when I did so in Reykjavik - just a friendly no-no honk from a motorist.

Now – the photography. I downloaded and read ‘Photo Guide to Iceland’, a free e-book, long before the trip. Written by two Icelandic photographers, I found it extremely useful in planning out where to photograph, and therefore where to pre-book guesthouses.

Once at the various sites, I was pleased to find that nobody was there collecting an entrance fee. The only time I had to pay at these sites was to use the washroom, which is generally 100 ISK (about $1.10 CDN). Keep loose change handy!

Hruanfossar

By far, the most plentiful photogenic sites are waterfalls (“foss” in Icelandic). It’s like the whole country is leaking out of every pore! To photograph them with best effect, a tripod and remote shutter release are mandatory. I took the column out of the legs and removed the handles of my tripod to allow it to pack nicely in my checked baggage, so don’t worry about taking it with you. Then, if you want the water to look creamy as it tumbles over the waterfall, you will need to use a neutral density filter of at least 5 to 6 stops. Stop your lens down to f/18 or smaller, set ISO to 100, and aim for about a 1 second exposure. Anything longer won’t improve the effect, and in fact will increase the risk that you will get a slightly blurred shot if the wind moves it (and it does blow strongly there). Variable ND filters will do the trick, but beware that at higher density settings (ie. more stops) you will start to see a cross-like pattern resulting in dark patches. I’m going to ditch the variable in future and carry a fixed 5 or 6 stop filter instead.

Mount Hekla Volcano in Cloud

It’s not hard to find mountains, glaciers and volcanoes brooding in clouds. In order to capture the full range of tones in such scenes (particularly if sunshine is breaking through the clouds) I resort to exposure bracketing. This involves taking three shots rapidly in sequence; one normal exposure, one underexposed by two stops and one overexposed by 2 stops. This is easily done with the camera’s AEB (Auto Exposure Bracketing) setting. Then, I like to use High Dynamic Range software like Photomatix to produce a final image that exhibits a tonal range not achievable with a single exposure.

Of course, there are a lot more subjects for the photographer to capture than the ones I have mentioned, including geysers, geothermal areas and moss-covered lava rock formations. In the meantime, you can see what I have photographed in my online gallery at http://bit.ly/2ziEmOp.

At the risk of sounding like I have lots of things in Iceland to moan about (including rain!), I have to say something about Keflavik airport, and then I’ll zip it. In defence of the designers of the terminal, the plans were probably cast before annual tourist traffic reached the 1.5 million mark. Today, though, it can sometimes be nothing short of chaotic.

In North America, most airport terminals have a wide corridor and gate areas with ample places where people waiting to board can sit. At Keflavik, a ‘gate’ more or less consists of a door to buses that take you to the plane. If you want to sit, there are usually seats in the middle of the corridor and not necessarily near your gate. When one or more gates get called, you end up in a massive crowd that blocks the corridor. You’re not even sure if you’re in the right lineup at times! To make things worse, arriving passengers have to  barge their way across the boarding lineups. End of rant.
All that said, Iceland is a beautiful place to visit and photograph. Just about everyone speaks English, and eloquently. People are helpful and welcoming. The terrain is stunning. Reykjavik is charming. What’s not to like? Just go –you won’t regret it.

Monday 20 February 2017

Making Time Lapse Motion Capture of the Night Sky

In previous blog posts, I’ve written about taking still pictures of the night sky, and how to take time exposures in daylight. Now, let’s look at the ten basic steps for capturing the motion of the stars:

1.       Leave town. I typically drive 1 to 2 hours north of the city to get away from its ‘light dome’.

2.       Make sure you have a sturdy tripod for your DSLR.

3.       Use as wide-angle a lens as you can get. For a full frame sensor, consider using anywhere from 14mm to 18mm focal length. For APS-C sensors (ie. Canon Rebel or equivalent), a 10 to 12 mm focal length will work. Camera brand lenses can be outrageously expensive, so consider much cheaper but still good third party brands like Rokinon or Tokina.

4.       Consider getting an intervalometer, or at least a wired shutter release for your camera. Either one will cost you less than $20 on eBay.
Intervalometer


5.       If the air temperature is expected to drop below the dew point, be ready to clear condensation off your lens. You could use a microfibre cloth between shots, buy a battery operated fan at the dollar store to keep the air moving across the front of the lens, or look into some form of lens warmer.

6.       Set your ISO to about 3200 and your shooting mode to Manual. Since you want to keep exposure to less than 30 seconds to prevent the stars from creating noticeable trails on each frame you shoot, select a value between 20 and 30 seconds and set aperture to maximum (ie. f/2.8). I use f/4 with success, but it might force the choice of 30 seconds over 20 seconds. You may also want to use a fixed White Balance mode instead of Auto, but I generally have not found Auto to be a problem.

Normal Infinity Focus Setting
7.       If your lens has a focus scale, set it to the vertical bar near the infinity mark, but not at the infinity mark. Take a test shot and zoom in on the playback to see if you have optimal focus. If not, tweak it very slightly and re-check. The actual infinity focus point varies slightly with focal length, so leave the lens at your intended focal length when setting the focus point, and only zoom in on the playback to verify it.

8.       If using an intervalometer, set your camera to Bulb (may be found in Manual mode settings or may be a separate mode depending on the camera). Set the intervalometer shutter  ‘on’ time to 20 to 30 seconds (depending on your test shots), set its interval between shutter actuations to something like 5 seconds (to allow you to wipe condensation off the lens between shots), and set the number of frames to about 150. I normally shoot with RAW+JPEG, but you may want to consider doing such a long sequence in JPEG only to conserve memory card space. Elapsed time will be close to an hour and a half, so bring a coffee flask!

9.       If using a simple wired shutter release, set the camera to burst or continuous mode instead of single shot mode. You will not use Bulb mode in this case. Instead, select either 20 or 30 seconds for your shutter speed in Manual mode. When ready to start, use the lock on the wired release to hold the shutter button on. The camera will take one shot immediately after the other with no breather in between. This will get the sequence over with more quickly than when using an intervalometer with a 5 second breather, but you won’t have an opportunity to clean off condensation between shots. Depending on the camera, you may also have to manually keep track of the number of shots taken.

10.   Find an interesting object on earth that you can anchor your shots to. Put it in the lowe part of your frame, about a third of the way in from the edge. You can have it silhouette against the sky, or use a flashlight to do a little light painting. In a sequence, however, you may want to forget the light painting because it is difficult to make the object look uniformly lit in all 150 or so frames. Now, consider putting Polaris somewhere in your shots, so you can see the stars rotate around it in your final sequence.

That takes care of the capture portion. Now for the post-production steps:

1.       I import all 150 frames (images) into Lightroom. Then, if corrections for exposure, white balance, etc. are needed, you can make the changes to one frame and sync the changes to all 150. Similarly, I have set up a custom crop mode in Lightroom for 16x9, so that the resultant video will frame properly on television. Again, I can crop one and sync-crop all the others.

2.       A sidebar on ‘stuck’ pixels: You are going to notice that there will be bright spots on all frames, which don’t move with the stars. These are generally due to the long exposures and the number of such exposures, which result in heating up of the sensor. If these are left alone, it will look weird once you put all the stars in motion, since stuck pixels don’t move. You could use the camera’s long exposure noise reduction feature to mitigate this, but you will be out there for three hours instead of one and a half hours capturing the 150 frames. My approach is to use the clone brush in Lightroom on one frame and sync to all other frames.This is the most time-intensive and frustrating part of the process due to thenumber of stuck pixels my camera produces, and the way you clone them out may adversely affect other frames once you sync. There is a bit of an art to it, and I could write a whole treatise on it. But not now.

3.       Once I’ve cleaned up all the frames, I export them from Lightroom as TIFF files. At this point, you may want to decide if you simply want to make a video clip of the stars rotating around Polaris, or create progressively longer and longer star trails as they rotate. For the latter, you could use StarStax. This software creates another set of files in which the star trails get progressively longer. This is done by ticking a checkbox in the settings menu to force it to save a file every time it adds another file to the sequence. If you don’t check the box, it will only create one file that consists of all 150 frames forming a single long trail for each star.

4.       Now to put things in motion. There are a number of software packages that can accomplish this, but I use my Corel VideoStudio video editor. In that software, you simply right-click on an empty timeline and select the time lapse option(‘Insert Photo for Time-lapse/Strobe’). You then tell it where your frames are and how long you want to make the clip (I generally start with about 10 seconds), and the frames load onto the timeline. If you want to have the stars rotate without making trails, use the files you exported out of Lightroom. On the other hand, if you want the stars to create progressively longer star trails, use the files created by StarStax.


5.       Now you can create a finished video (Share tab in Corel). I prefer to save mine in .mp4 format. Have a look at my two samples on YouTube. One is without StarStax (Milky Way video) and the other is with StarStax (observatory video).  I hope these inspire you to try out this fun technique.


Tuesday 12 July 2016

Catching a Falling Star

There I was at Point Clark, Ontario on the edge of Lake Huron with a friend, innocently taking a time lapse sequence of the gorgeous night sky. Just a few frames from the end of my 150-frame sequence, probably the brightest meteor I have seen in recent years streaked across the sky.

Since I was shooting 20-second exposures at ISO 3200, there was plenty of opportunity for the meteor’s short life span to be captured. I was just lucky, however, that it didn’t perform its burnout while my camera was taking a 5-second breather between shots.

My intent that night was to capture the elusive Milky Way. Not only did I get the best shots ever of the MW and its bright core, but to capture it and a meteor in one shot?….Serendipity.

Tick that box on my bucket list.


Monday 13 June 2016

TRY TIME EXPOSURES FOR ETHEREAL EFFECTS


When we think about taking long exposures with a camera, night time images usually come to mind. Only dark conditions generally call for slow shutter speeds, right?

True-but there is a way to take time exposures in broad daylight...with surprising results.

So the first question that comes to mind is: how do you take a long exposure in bright light? Won’t the camera try to set a fast shutter speed to ensure that the exposure is correct, regardless of how small the aperture is set?

Then there’s the other question: why would you want to take long exposures in daytime, anyway?

OK - a long time exposure (keeping the camera’s shutter open for a long time – from seconds to minutes) will occur when:

  • Light level is very low
  • A very small aperture is chosen, and
  • ISO is set to the lowest value that the camera will allow.

So, to answer the first question, you need to simulate low light conditions by giving your camera dark sunglasses. The device that will do this is an inexpensive thread-on piece of glass called a neutral density (ND) filter. These filters come in a wide variety of grades and are either specified in ‘stops’ or ‘times’.  They are also available as variable grade versions, often referred to as Fader NDs. Be sure to buy one that has the same filter thread diameter as your lens.

A one-stop (or two times) ND filter, with aperture and ISO remaining the same, will require that you force the shutter to stay open twice as long to get the same exposure as you would without the filter. Similarly, a two-stop filter will require slowing the shutter by four times, since a stop means a factor of two in exposure. For the kind of images I’m proposing we take, you will need a ten-stop filter in order to get exposures that are minutes long. This is equivalent to increasing exposure by a factor of 1024 times, but is usually referred to as a 1000 times filter.


Why minutes? Well, in answer to the second question above, anything moving (water, clouds) will take on a foggy (in the case of waves) or streaky (in the case of clouds) look. As long as you have stationary elements in the scene, such as rocks, ground and a tree trunk in the sample shots shown in this post, the viewer is confronted with a paradox that doesn’t appear ‘natural’. This makes for a more interesting image than if you had captured the same scene with a shutter speed of, say, 1/250th of a second. While these images were shot in colour, I converted them to black and white, since they tend to look more dramatic that way.

And now for the practical considerations. You will need:

  • A stable tripod
  • A remote shutter release that plugs into your camera, since you can’t hold down the shutter button on your camera for minutes without jarring it. You can also get an intervalometer, which allows you to set a specific time interval without having to manually time the shutter.
  • A camera with a Manual mode that will allow you to set the shutter to ‘Bulb’, or one that has a dedicated Bulb mode.
  • A day with calm winds, so that your tripod doesn’t get buffeted during the exposure.

Look for a scene that has a combination of moving and stationary components. Getting the right exposure is definitely going to take some experimentation. As a starting point, set your camera’s ISO to the lowest value it provides. This is typically 100. Do NOT use Auto ISO. In Manual / Bulb mode, set the aperture to a value anywhere in the range of f/16 to f/22. This will depend on whether it’s an overcast or sunny day. You should get exposures in the range of 2 to 4 minutes. Use the histogram to confirm good exposure and tweak the time (or aperture) as needed to get perfect exposure or desired motion effect.

With digital SLRs, a practical consideration is the heating of the sensor during long exposures. While it won’t damage the camera, this heating tends to amplify what are often referred to as ‘stuck pixels’. Every camera has them, and they appear as unexpected bright spots on the final image.

To combat this, DSLRs generally have a long exposure noise reduction setting which can mitigate this annoyance. Unfortunately, it requires that the camera will make you wait twice as long to see your image, since it takes as long again as the exposure time to process out the stuck pixels. This could result in an 8 minute wait until you take the next shot. While this technique is effective, I prefer to take my chances and fix the spots after in either Lightroom or Photoshop.

By way of a summary, here are the steps I take:

  1. Set up the camera on the tripod and compose the scene with the chosen lens.
  2. Ensure ISO is at its lowest setting, and choose a small aperture to help force a long exposure and to give me the depth of field I want.
  3. Plug in the remote shutter release or intervalometer (and set it to the exposure time I want).
  4. Thread on the ten-stop ND filter, being careful not to disturb focal length or focus settings.
  5. Cover up the eyepiece if the sun is behind me, to prevent light leak onto the image (it has happened to me!)
  6. Check my image and histogram, rinse and repeat until I get the right exposure and effect.

It’s a slow process that requires patience. At the end of it though, you will get images that will be set apart from the ordinary.

Thursday 18 February 2016

Get Amazing Depth of Field with Focus Stacking


When we think about creating a photograph with everything in sharp focus from a few centimetres in front of the lens out to the horizon, we immediately think that we will need to ‘stop down’ to an incredibly small aperture and focus at the hyperfocal distance. Unfortunately, that means we will have to use extremely long time exposures to make up for the light lost with the small aperture, and who knows where the hyperfocal distance is anyway!?

You could invest heavily in a tilt/shift lens instead, but there is a way to use your current lenses to get this result. I am going to describe the procedure on the assumption that Photoshop is available to you, but there are inexpensive software packages available as well to perform what is referred to as focus stacking (Google it).

Before we get to the software, let’s outline the image capture procedure. The idea is to capture a number of images of the same scene (a tripod is a must for this), successively refocusing from closeup to infinity in small steps. The successive images must overlap in terms of focus. For this reason, it would be wise to use a fairly small aperture (like f/16, if the light allows), in aperture priority or manual mode, to give each shot as wide a depth of field as possible. Small focus steps will ensure the in-focus zones from one shot to the next overlap each other. This will require some experimentation with your lens. Take as many shots as you want. This will guarantee a good result, and the software will have no problem handling them.

Note that as you refocus, the size of the image changes slightly. For that reason, the first job of the software is to align all of the shots based on their content. Because each shot contains zones that are out of focus, the next job of the software is to blend the images together while removing the defocused zones from each.

When aligning the shots, the software creates a layered file comprised of each shot on a different layer (hence the ‘stacking’ term). To eliminate the defocused zones, it adds a mask to each layer which blocks out these zones individually.

So here are the steps I use in Photoshop. It is possible to align and blend all shots at once, but I found it gave me screwy results. Instead, I do the following:

1.       Open all of the shots in your sequence (at the same time to save time)

2.       Select File > Automate > Photomerge.

3.       Under Layout in the dialog box, select Collage. Under Source Files click Add Open Files. Uncheck the Blend Images Together box (I do this to avoid the aforementioned screwy results). The software creates a new, layered ‘Panorama’ file with content on all layers now aligned. Note that you will probably have to crop the edges where overlap did not occur.

4.       Highlight all layers using Shift-Click or Ctrl-Click. Select Edit > Auto-Blend Layers…, then check the Stack Images radio button and OK.

Now here’s where it can get a little tricky. If you zoom in to the resultant image and find some soft-focused areas, it means Photoshop didn’t quite get the masks right in that area. If you find a number of these areas, the fix will take time and patience. You can turn layers on and off by clicking the eyeball icon on each layer. With all layers turned off except one, you will clearly see where the mask on that visible layer has eliminated part of that layer (checkerboarded areas). By stepping this way through all layers, you will see where the trouble spots are. You may need to erase these areas from one mask (where Photoshop has left in a defocused area) and add to the mask on another layer where that area is in focus.

How do you subtract from or add to a mask? Click on that mask (the rightmost rectangle on a layer), select the Brush tool from the tool palette and choose the white patch from the bottom of the palette, and paint the image. You will see this reveals more of the image on that layer; in other words, it is removing part of the mask. To cover up part of the image on a layer (in this case, a defocused area for instance), use a black brush. Adjust the size and hardness of the brush to get the desired control. As I said, this can involve a lot of work.

First Image in Sequence
The sample images here show the first and last images in a stack sequence, and the resultant focus-stacked image. The actual number of images in the stack was 11, but the first and last images demonstrate how the background and foreground, respectively, are distinctly out of focus.  All shots were made at f/6.3, so each has a shallow depth of field. Despite that, the resultant image looks terrific.

Last Image in Sequence
Of course, if you have decent light you could avoid using focus stacking by using a very small aperture such as f/22 and focusing at hyperfocal distance. But this too requires skill in determining the right focus point.

Focus stacking may be too over-the-top for many, but if you are passionate about pushing your photography up a notch, your efforts will be greatly rewarded by trying it.


Focus-Stacked Final Image

Monday 12 October 2015

Sharpness and Contrast: Lenses Compared


There is a vast range of pricing in lenses, so I decided to find out for myself if the most expensive lenses are really any better.

High up in this rank is the name Zeiss, and yes, the prices are out of reach for most of us. So, rather than take a chance on potential high-priced disappointment through a purchase, I decided to rent a Zeiss ZE 85mm f/1.4 Planar T for the weekend.

NOTE: Not all Zeiss lenses are more expensive than the camera manufacturers' own lenses. In fact, the Zeiss Planar lens tested here is actually cheaper by far than Canon's 85mm f/1.2 L series. The Zeiss OTUS 85mm f/1.4 lens,  however, is more than twice the price of the Canon.

My plan was to test it on my Canon 6D against the Canon 24-105mm L series zoom set to about 85mm focal length and a Mamiya M645 55mm f/2.8 medium format lens through an adaptor. Right off the bat, I must point out that it is a bit unfair to compare the 24-105 zoom against prime lenses, but after all, it is an L series lens that Canon touts as very high quality.

Also, since the Mamiya has a larger image circle than the other lenses, which were designed for a full frame sensor, only the centre portion of the Mamiya’s projected image was being used. As we know, aberrations are more pronounced at the edges, so the Mamiya has the advantage of having only its sharpest central area used in the comparison.

The test was not a rigorous scientific one. I used a test chart downloaded from the Internet for my basic comparison of resolution and contrast, then took a few outdoor shots for a more subjective head-to-head. I tried to frame up the shots the same in each case, since I was using different focal lengths (85mm and 55mm). That way, the necessity of unfairly having to enlarge the 55mm shots (and enlarging the apparent pixel size) would create a disadvantage for the Mamiya lens. Similarly, I tried matching the exposures in the camera as much as possible, but inevitably, a bit of exposure tweaking in post was needed to align the white end of the histograms. I felt this was necessary to get a fair comparison of contrast.

Test Chart Results Compared
I must preface this comparison by saying that focus is critical for a fair comparison, and I can’t guarantee that in each case I was perfectly focused. I did, however, choose the shots out of many iterations that I think represented the best focus for each lens.

The images compared here were all cropped from 100% views in Photoshop. At 100% , you are very close to seeing the limitation of the sensor in resolving detail, so even a premium lens may not seem razor sharp at such magnification.

Having said that, and with focus differences aside, the comparison is fair. Looking at the chart centre comparisons below, the Zeiss and the Mamiya seem to be comparable on a sharpness basis, while the Canon is slightly softer. This is most apparent in the fine rings in the ‘bullseye’, and in the vertical tapered stripes (next to the 16, 18, 20 marks on the right) where the Canon looks a little mushy. In fact, the Mamiya seems to have the best contrast in that zone, but critical focusing may have given it a slight advantage over the Zeiss.


Zeiss - test chart centre
 
Mamiya -test chart centre
Canon - test chart centre
Strangely, the Canon seems to give the best contrast with blacker blacks, which I would have expected the Zeiss to excel at. This, however, may be due to the fact that the Canon was not resolving the faint dot pattern (from printing the chart) that made up the black areas, and was blocking them in as solid black. Keep in mind also that the exposure was tweaked on each to ensure the white area in the centre of the ‘bullseye’ was matched across all three in terms of intensity to allow a comparison of blacks, and thus contrast.

The corner comparisons are where the differences became apparent. While both the Zeiss and the Mamiya (ignoring the chart tilt) maintained nice right angled corners, the Canon showed flawed geometry. In addition, the Canon also went very soft. Again, perhaps it’s unfair to compare a zoom's performance versus a prime's, but it’s convincing enough to make you think twice about using a zoom in a critical shoot. Also, we don’t know how the Mamiya would stack up against the Zeiss in the corners, because we’re really only using the centre portion of the Mamiya’s image circle. While very subtle, I would say the Zeiss was slightly sharper than the Mamiya in this area.

Zeiss - test chart corner
Mamiya - test chart corner
Canon - test chart corner
Subjective Outdoor Results Compared
Ok – this is where it gets even less scientific, but after all, the subjective result is probably what will convince you whether or not a particular lens will work for your type of photography.

For this comparison I used a population of one (scene, that is). Not totally representative of what a lens can capture, of course, but time eludes me on this little project.

A tripod was used to centre on the same flower bud, but slight tweaks on tripod height and position, to frame all three shots equally to compensate for focal length differences, resulted in slight differences in perspective. In Photoshop I also tried to equalize white balance and exposure.


To me, the Zeiss is the winner in this scenario. While the Mamiya appears to be comparable in sharpness (using the little hairs on the leaves as a reference), the contrast overall is stronger on the Zeiss. While the Canon’s contrast seems comparable to the Zeiss’, its sharpness didn’t stack up to either the Mamiya's or the Zeiss'.
Conclusions: Are the elite lenses  worth the coin?
From the moment that you first look through the Zeiss and examine the first shot, the reaction is “Wow – this is a nice lens”. After all, the heft of the all-metal barrel and the size of the glass definitely give you the impression of quality.

Before succumbing to the desire to just buy it no matter the cost, soberly think about your budget and the type of shooting you do. If you do high end portraiture or regularly sell landscapes through galleries, you can probably afford to cut to the chase and buy the best. On the other hand, if photography is a part-time money-maker, or even just your obsession, the budget-conscious do have more affordable alternatives.

I should make one other point. While the maximum aperture of the Zeiss was a lovely f/1.4, every lens performs at its worst, aberration-wise, at maximum aperture. While bokeh is gorgeous at f/1.4, there was a definite soft-focus look at that aperture. Subjectively, I don’t think the lens cleaned up until about f/2.8. That’s ok, because the brighter the maximum aperture, the sooner you achieve optimum performance when you stop down.  Bokeh still looks great at f/2.8, whereas a lens that has a maximum  aperture of f/2.8 may not perform will until you stop down to f/5.6 or smaller.

For my budget, the Zeiss are tempting, but a little too rich. I would prefer to  find used medium format lenses and adapt them to the 6D, because both the test chart and subjective comparisons show that the sharpness (while perhaps not the contrast) compare favourably to the Zeiss. One caveat: medium format lenses are somewhat vintage. Be sure to confirm that there are no signs of yellowing or coating separation on the glass before making your purchase from afar on eBay or other sites.

As a final note, don't discount vintage 35mm film lenses (with appropriate adaptors). I was going to include one in this review, but felt I needed to pull in the reins. Subjectively, I can tell you the Asahi Pentax 55mm f/2 I have was as sharp as the Mamiya and Zeiss at the centre. I suspect corner performance may not be as good, though. But for the price......

Thursday 22 January 2015

INFRARED ON THE CHEAP

We've all seen the articles stating that you can get otherworldly infrared effects by having a little irreversible surgery done to your DSLR sensor. Without a special filter that's mounted in front of the camera's CMOS sensor, infrared light would normally spoil your images. So, in order to invite infrared light in, the filter needs to be removed. Not willing to dedicate a DSLR to infrared-only, I looked for other ways to easily get on the infrared bandwagon.

As I still occasionally shoot with medium format black and white film, the obvious thing for me was to get some infrared-sensitive film and a recommended filter. This filter is a deep red filter that favours light with wavelengths of 720 nanometers or longer. If this is sounding too techie and out of your league - hang in there - I have a simple digital solution.


By taking that same filter and holding it in front of my CCD sensor-based point and shoot camera, I was astounded at how well the infrared effect came through. Now, in colour, the image does look ethereal, but predominantly red. My preference is to either switch the camera to monochrome before taking the shot, or convert to black and white after in software. After shooting the same scenes using this technique and then using the film camera with the same filter, the results are surprisingly similar.

The reason that the CCD sensor works is that it doesn't have the infrared-removing filter that's built onto CMOS sensors. So, by using a deep red filter in front of a CCD camera lens, you are filtering out much of the visible light and letting mainly infrared light hit the sensor. Using the filter in front of my CMOS-based DSLR camera, however, I verified that the infrared effect is not really achievable.

What about using smartphone cameras with this method? Unfortunately, the newer phones seem to be equipped with CMOS sensors, so they're generally not a good candidate.

You may be wondering by now what this "infrared effect" is that I've been blathering on about. Simply, if you take picture through a deep red filter onto either infrared film or a CCD sensor on a sunny day, the vegetation (leaves, grass) will appear white or pale. It gives the impression that frost or snow has settled on the trees and lawn. At the same time, the sky appears dark, giving a dramatic contrasty scene.

Have a look at the two images in this post, both shot in summer with my point and shoot camera and the deep red filter. Have a tripod handy, though. The filter gives 5-6 stops of attenuation, meaning exposures are going to be very long.