Now, winter isn't my favourite season, but it does bring with it some opportunities.
Take the accompanying photo, for instance. Sometimes here in northern climes we can get fog even in the middle of winter. Not being a meteorologist, I'm guessing that it occurs when warmer, moist air descends on a cold surface. I refer to it as ice fog, because it results in ice crystals or hoar frost forming. The formations are as intricate as snowflakes. For a closeup look, go to www.realworldphoto.com and type 'hoar frost crystals' in the search box.
On a bigger scale, the photographic magic occurs when trees get covered with it. It's like a sugar frosting. Hence the fruit tree image.
Winter presents some challenges to the photographer, particularly when out in the early hours as the sun rises and the temperature is still low. Frostbite is a possibility, particularly when trying to operate delicate camera switches with bare hands. Batteries can also pooch out early, particularly if they weren't fully charged before setting out. But when you capture the sparkle on the snow, the warm early sun and a glowing red barn on one image, it makes it all worth while.
Monday, 5 December 2011
Saturday, 19 November 2011
Crazy Composite
I've always had this scene in my mind whenever I've heard the song 'Crazy River' by Robbie Robertson, so I decided to build a composite image of my interpretation.
First, I shot an empty field toward sunset. Easy peasy. Because I wanted to give it a Louisiana bayou atmosphere, I figured it needed a big lazy moon. No problem - I had one on a slide. And stars came from a time exposure I shot weeks earlier. A bit of artistic license led to the meteor (or comet if you wish).
Robbie called for an abandoned '59 Chevy. Fat chance finding one of those, so I ordered a scale diecast model for $10 on Ebay. A bit of watercolour paint dabbed on it emulated the rust. To make it look like the car battery had been fiddled with to make the car radio work (so the occupant could listen to Little Willie John), I propped up the hood and lit up a yellow LED on the front seat to make it look like the dash was illuminated. A strobe with a blue filter emulated moonlight along the car's side.
The occupant lying in the back seat had to be created. I've never hired a model and wasn't about to for a personal project, so I was it. With a remote shutter trigger in hand, and side lit by an orange-filtered strobe, I became Robbie's character.
Using lots of layers and layer masks in Photoshop®, I built my composite using the field as a background. A deep blue photo filter layer converted the daylight field to a nighttime field. The masks were used for making the grass appear to be growing around the car and placing the appropriate parts of my body in the back seat. The burn tool added the car's shadow onto the grass. Matching the car to the surroundings was probably the trickiest part, involving a lot of edge smoothing using that layer's mask.
It took many hours to create, but was a great learning experience. One takeaway on big projects like this is to save your work as different (layered) files as you progress, so that you can always go back and rebuild if you really mess up.
Friday, 18 November 2011
Framing the Night Sky
Taking photos that include stars and other heavenly objects obviously involves a stable tripod, no wind and a clear night sky. It also doesn't hurt to gain permission (as I did) to enter property that gives you a unique vantage point from which to photograph.
There are a number of 'dark sky' locations available throughout North America that give you this access for free, but I wanted to include an obvious icon in my shots - an observatory. As luck would have it, a full moon was scheduled to come up that night. Just as it peeked over the horizon, I took a 4 minute exposure at f/8, using only the moon to illuminate the dome.
Over that time period, the stars left long streaks as the earth rotated. I decided that I wanted the stars to appear as short streaks in this shot to make the constellations more recognizable, so I 'cheated' by cloning out part of the trails in Photoshop® (yes - every one of them - and there were lots). That way, the Big Dipper (Ursa Major) is clearly visible, and points the way to Polaris (the North Star) in the upper right corner.
Using the same observatory, I've also made similar shots without the aid of Old Man Moon, but rather a flash with red filter fired off several times during a time exposure. These can be seen at http://bit.ly/p6g9VK
Friday, 26 August 2011
Guide Numbers and Watt-Seconds
Whenever I think about hauling lighting equipment to a location, the question comes up: Should I take a.c. strobes, extension cords and power bars, or will a couple of hot-shoe flashes, umbrellas and stands do it? Hmmmm...I know what I'd prefer.
The trouble is, hot-shoe flash output is (usually) expressed in Guide Numbers (GN) while strobes are rated in Watt-seconds. Sadly, there is no easy way to relate the two, so I made a quick setup to measure the output of each. I've always assumed that a 150 Watt-second strobe would blow away a flash in terms of light output, but I was about to be surprised.
Now, we should start with definitions. GN is the product of the distance of the flash to the subject and the f stop being used at a particular ISO setting (or film speed). Example: I set my flash meter at a sensitivity of 100 ISO and placed it at 10 feet from the flash. I fired the flash and read the f stop it was recommending. For a flash rated at GN 80 (ft - ISO 100), you would read f/8 on the meter (f/8 x 10 ft). Indeed, my Sigma EF 500 came in close at f/7.6 (hence a GN of 76).
Next, I set up the 150 Watt-second strobe at the same location as the flash, set it for full power, and blasted away. Here's the surprise: it read f/7.9 on the light meter, meaning its GN equivalent is 79, which is barely better than the Sigma. Admittedly, there are a couple of variables here. One is that the light meter is older and uncalibrated, and the Sigma's batteries may not have been at peak voltage. The point, however, is that on a relative basis you can determine how your strobe/flash sources compare. This is particularly helpful when the manufacturer of the flash doesn't provide the GN.
So GN is a measure of the amount of light available for proper exposure of a subject at a particular combination of distance from the flash and camera aperture setting, on a camera set at a particular ISO sensitivity. On the other hand, Watt-seconds are a measure of the electrical energy expended in the strobe tube (Watts are the rate at which energy is used, so multiplying by time gives energy used over that time period). This measure doesn't take into account the conversion efficiency of the tube from electrical energy to light energy, or the effect of the reflector behind it. Hence, GN and Watt-seconds can't be related mathematically.
Bottom line: measure the output of each with a flash meter so you know how they relate. Similarly, if you double the Watt-seconds you can expect the guide number to double, since it should add another stop to the flash meter reading.
Then, you write your results down, as I did, so that confusion doesn't ensue.
Friday, 8 July 2011
A Fine Mess
When it comes right down to it, I'm a bit lazy when it comes to scouting out new locations for my still photography.
By pointing to an unknown spot on a map and getting in the car to drive there on the hope that I'll find a photographic treasure is a bit chancy. What if the time of year or day are not right, and what if the place turns out to be boring, or worse yet, a dump?
Sometimes, though, a dump turns into that photographic treasure. And, sometimes, someone else arranges it for you so you don't have to find it for yourself. Sweet.
This happened back in May when I found out that an abandoned factory was being opened up to photographers for the day. It was the Massey Ferguson tractor plant in Brantford, Ontario, which hasn't been used since the 80s. Now, calling it a dump is a bit harsh, but after all, the buildings and the grounds were in a state of extreme neglect. So much so that the fire department inspected the premises earlier in the week and decided to make building interiors off-limits to photographers.
Most of the time, we strive to photograph scenes that are pristine. Yet, having the opportunity to capture decay, grime and a depressing industrial atmosphere is strangely inspirational.
A Fine Mess - Images by Gordon Wood
Wednesday, 30 March 2011
How Not to Use Studio Strobes
It’s obvious that some overseas companies rely on (bad) software that literally translates every word from their language into the closest English word, but, of course, completely out of context. It’s a good thing that this particular product I purchased online was simple enough that I didn’t need instructions, because three years later I’m still trying to decrypt the piece of paper that came with it.
It’s actually quite amusing to read, and it amazes me that they wrote so much about how to use a simple, slave-only strobe that screws into a light bulb socket. Here are some snippets, and my interpretations:
“Thank you to choose the series electronics to dodge the lamp, it is that the ideal light source taken a photograph is dodged in the various rooms that this series electronics dodges the lamp.”
INTERPRETATION: Not sure why you’d want to dodge the lamp, but they’re deeply grateful that I purchased it.
“It still possesses advanced the gleaming remote sensing device, can receive the pulse and gleams at the distant range place, thus synchronously gleaming with the signal voluntarily, the lamp colour temperature ideal is dodged to this series, and it is big to shine the angle, and ability and various soft light umbrellas and reflection of light umbrella cooperate to use in the reality is applied, but effect is better.”
INTERPRETATION: OK, so apart from being a hellishly long sentence, I get the idea that it gleams (handy for a strobe light), remotely triggers without a struggle, has a dodged (aha – matched maybe?!!) colour temperature (to what, we’re not sure) and gleams nicely (in reality) with a bounce umbrella, or not.
“The item is paid attention to:
1. Long-term whens disuse, the dump, and at a distance from one period to the electronics dodges the lamp to be charged to try to dodge several times, and can lengthen the electronics dodging life span. Leave, and is not affected with damp to be heated.”
INTERPRETATION: Methinks it can hold its charge for a long time after it’s unplugged, and is ready to be fired (oh-oh, is that what dodged means?) when screwed back into the socket. And, whatever you do, remember never to heat the damp.
It continues:
“2. Not dismantling the electronics, if the sick requests (company name withheld) repair section or this company to be engaged by special arrangement the maintenance ministry and repairs at will.”
INTERPRETATION: They have a Maintenance Ministry in their country, so if you try to take apart your sick (strobe), a school bus will pull up to your door and several heavily armed Ministry auditors, accountants and actuarials will kick your door down and throw you to the floor.
If there are any overseas manufacturers reading this, I would like them to know that in addition to being a wonderful stock and fine art photographer, I’m also a technical writer and a very good proofreader. So, please get in touch at my other web site: www.taskpartner.ca
Country Comforts
It's surprising how many times you glance around...and in that instant in time...you see a perfectly framed picture.
How many of those times did you actually have a camera with you? As it happens, this is one time when I did. I was visiting a friend who lives in a typical old Ontario farm house. As I was leaving, the sunlight dapple on the table highlighting the peppers, the old-fashioned wash bowl, the Muskoka (or Adirondack) chair and the wooden screen door caught my attention.
All that was missing was a snaggle-toothed yokel sitting on the porch, picking bluegrass on his banjo.
Achtung! Dangerous Old Films
The images in this gallery were taken by my great-great uncle, Heinrich Schildknecht, an Austrian "alpine" photographer.
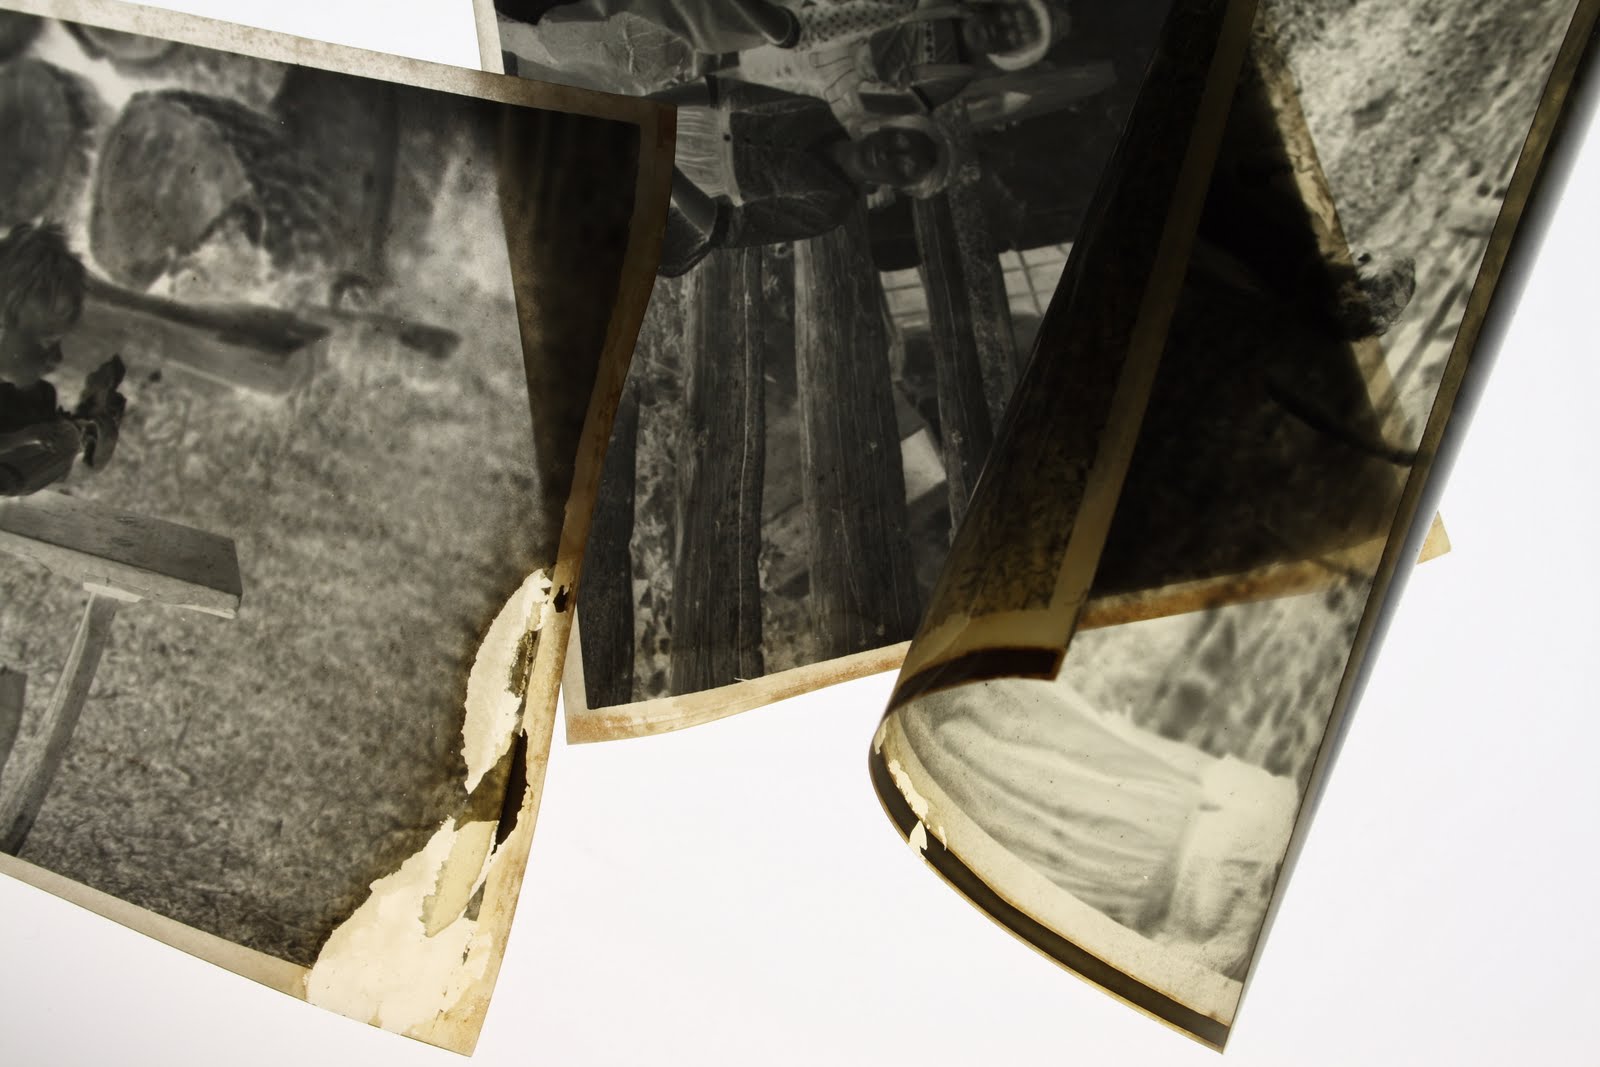
The 4"x5.75" negatives were given to me by his grandson when I met him in Europe several years ago. It's difficult to date them because the date that the photographer wrote on the envelope looks like it could either be 1919 or 1929. Now that I have a flatbed scanner with a transparency unit, I thought it was time to preserve them.
I remember asking his grandson whether or not he had his grandfather's complete collection of negatives. He replied "No, my grandfather's studio burned down". I'm not surprised.
To the best of my knowledge, the items he gave me are made with a cellulose nitrate base. Most articles you read about this type of film give dire warnings that they are extremely flammable. The typical advice is to copy them, then dispose of them properly.
Two of the many signs that films are made of cellulose nitrate are the tendency to curl and turn amber as they age. Have a look at the picture of my negs. They definitely exhibit these characteristics. The ones that curl the most seem to have a thicker base, while the flat ones are almost as thin as paper.
In some cases, the experts warn, the emulsion becomes sticky and gives off a toxic gas. Luckily, mine do not have this problem, although the emulsion is flaking in places.
There are several ways to test these films to determine whether or not they are cellulose nitrate, as outlined in this excellent article: http://bit.ly/aAKaQi. I decided to try the burn test with a strip of each of the thin and thick bases.
With the fire department on speed dial, I headed outside in the snow, far from the house and lit 'em up. Yup -the thick base burned very quickly and crackled a bit like a sparkler. The thin base was a bit more sluggish, but also burned fairly quickly.
The safe assumption is that these are cellulose nitrate bases, so I'll be doing the right thing and disposing after copying. I may even wait for a fireworks celebration and have my own backyard spectacle. If a reader more knowledgeable than I has more insight into these negs, I would appreciate a comment.
Amazingly, from the timeline in this document (http://bit.ly/d4ysrt), Kodak introduced an acetate safety film in 1908, but continued to produce cellulose nitrates until 1951. I can't speak for other manufacturers, though, but this seems to defy common sense!
The 4"x5.75" negatives were given to me by his grandson when I met him in Europe several years ago. It's difficult to date them because the date that the photographer wrote on the envelope looks like it could either be 1919 or 1929. Now that I have a flatbed scanner with a transparency unit, I thought it was time to preserve them.
I remember asking his grandson whether or not he had his grandfather's complete collection of negatives. He replied "No, my grandfather's studio burned down". I'm not surprised.
To the best of my knowledge, the items he gave me are made with a cellulose nitrate base. Most articles you read about this type of film give dire warnings that they are extremely flammable. The typical advice is to copy them, then dispose of them properly.
Two of the many signs that films are made of cellulose nitrate are the tendency to curl and turn amber as they age. Have a look at the picture of my negs. They definitely exhibit these characteristics.
 The ones that curl the most seem to have a thicker base, while the flat ones are almost as thin as paper.
In some cases, the experts warn, the emulsion becomes sticky and gives off a toxic gas. Luckily, mine do not have this problem, although the emulsion is flaking in places.
There are several ways to test these films to determine whether or not they are cellulose nitrate, as outlined in this excellent article: http://bit.ly/aAKaQi. I decided to try the burn test with a strip of each of the thin and thick bases.
With the fire department on speed dial, I headed outside in the snow, far from the house and lit 'em up. Yup -the thick base burned very quickly and crackled a bit like a sparkler. The thin base was a bit more sluggish, but also burned fairly quickly.
The safe assumption is that these are cellulose nitrate bases, so I'll be doing the right thing and disposing after copying. I may even wait for a fireworks celebration and have my own backyard spectacle. If a reader more knowledgeable than I has more insight into these negs, I would appreciate a comment.
Amazingly, from the timeline in this document (http://bit.ly/d4ysrt), Kodak introduced an acetate safety film in 1908, but continued to produce cellulose nitrates until 1951. I can't speak for other manufacturers, though, but this seems to defy common sense!
Are Point-and-Shoot Cameras Really That Good?


As someone who shoots stock images using SLRs, it may seem strange that I find it necessary to have a digital point-and-shoot in my possession.
Not so strange when you consider that the lenses, resolution and exposure modes are starting to catch up with their big, interchangeable lens cousins. Besides, sometimes a small no-fuss camera, due to its portability, is available to capture images we would otherwise miss because we left our clunkier gear at home.
But can they really compete on image quality? I decided to pit a Canon Rebel XTi SLR against a Panasonic Lumix FX500 point-and-shoot, each claiming 10.1 megapixel resolution. I shot the same image outdoors on each camera in rapid succession, so the light was consistent. The Rebel was set to record in JPEG only (instead of RAW) so that it matched the Lumix method of recording. Each was set to aperture priority and f/8. Shutter speed was 1/40th to 1/50th for each. Both were set for auto white balance.
The fundamental difference between the two cameras, of course, is the physical size of the sensor and the technologies used. The Rebel uses a CMOS sensor, while the Lumix uses a smaller CCD sensor. To be accurate, it should be noted that the Lumix creates a 10.1 megapixel image when in 4:3 mode, while in 3:2 mode (to match the Rebel's aspect ratio)the image size is actually 9 megapixels.
Examining the zoomed-in crop of each image, it's apparent that the little CCD can't compete with the larger CMOS, both in terms of sharpness in transitions from white to red, for example, and in colour saturation in general. Also, the CCD appears "grainier" amongst the blades of grass, and falls short in latitude (or dynamic range) when compared to the Rebel image.
The results may seem obvious, given the smaller size and lower cost of the p & s. So why bother?
Well, I wanted to gauge just how far apart the quality levels were. In my opinion, while the p & s is not up to pro standard, it's still amazingly good. I'm going to use it to take test shots of scenes that I might want to return to later and shoot with the SLR. Besides, how many times have we jumped in the car and wished later that we had grabbed a camera?
Tuesday, 29 March 2011
Bear Necessities When Shooting The Grotto
I love "magic hour". That's the time around sunrise and sunset that photographers prefer, except the getting up before-the-crack-of-stupid part.
It's not so much the early rising that bothered me on the morning that I set out well before sunrise into the Bruce Peninsula National Park. My plan was to drive to the parking lot in the Park, then walk the 15-20 minutes in near darkness through the woods to the Grotto to set up for the dawn's early light. The problem was that the night before, the proprietor of the motel unnerved me by telling me that they had trouble with roaming bears tearing through the garbage bins.
Imagine my state of mind - hurrying along in the mirk, carrying lots of equipment and constantly looking over my shoulder to see if Yogi was eyeing me for breakfast. At that time of day, even in a National Park, you are very much alone in those woods.
Arriving at the water's edge, however, I was not only relieved but enchanted. The air was perfectly still, the sky cloudless and the water crystalline. Barely a ripple on the surface, so the rocks under the surface were as clear as those on the shore.
To be at such a magical spot at magic hour is something photographers long for. And, to have such beautiful warm (and might I say cooperative) weather at the end of October in Ontario, Canada added to the serendipity.
Needless to say, I scrambled all over the Grotto with my two cameras to capture as much as possible before the sun "spoiled" the scene. Above is one of the results - an image that I think best captures the atmosphere at that special place and time.
bruce peninsula national park photos
Cheap and Cheerful Coloured Gels for the Camera-Mount Flash
Occasionally, colouring the light from your camera-mount flash can add drama to a shot without having to lug around a powered strobe head. Some flashes come with plastic snap on filters, but if they don't, here's an inexpensive and simple solution.
Gel material is available from camera stores, but you could use any coloured acetate for this. Get adhesive-backed velcro strips from a fabric store. If you haven't already got velcro attached to your flash (for mounting commercially made foldable softboxes for instance), then make sure you buy both the 'male' and 'female' halves of the velcro system. One gender goes on top and bottom of the flash head, and the other in two strips on each gel square.
 For my flash, I cut the gel into 3.5" squares. This size has the benefit of fitting into a mini calendar jewel case (two gels fit into each case). My cases came from Effectuality (their part # CCM0CT). If your flash head needs more coverage than this size provides, these may not be big enough.
Just attach a gel and fire away. I like using the flash off-camera in optical slave mode so that I can use it to highlight a small area in a particular colour for a bit of drama. In the twin-lens camera shot below, my main strobe was used with an orange gel, and the flash with a blue filter off to the right provided the blue highlight.
Gel material is available from camera stores, but you could use any coloured acetate for this. Get adhesive-backed velcro strips from a fabric store. If you haven't already got velcro attached to your flash (for mounting commercially made foldable softboxes for instance), then make sure you buy both the 'male' and 'female' halves of the velcro system. One gender goes on top and bottom of the flash head, and the other in two strips on each gel square.
 For my flash, I cut the gel into 3.5" squares. This size has the benefit of fitting into a mini calendar jewel case (two gels fit into each case). My cases came from Effectuality (their part # CCM0CT). If your flash head needs more coverage than this size provides, these may not be big enough.
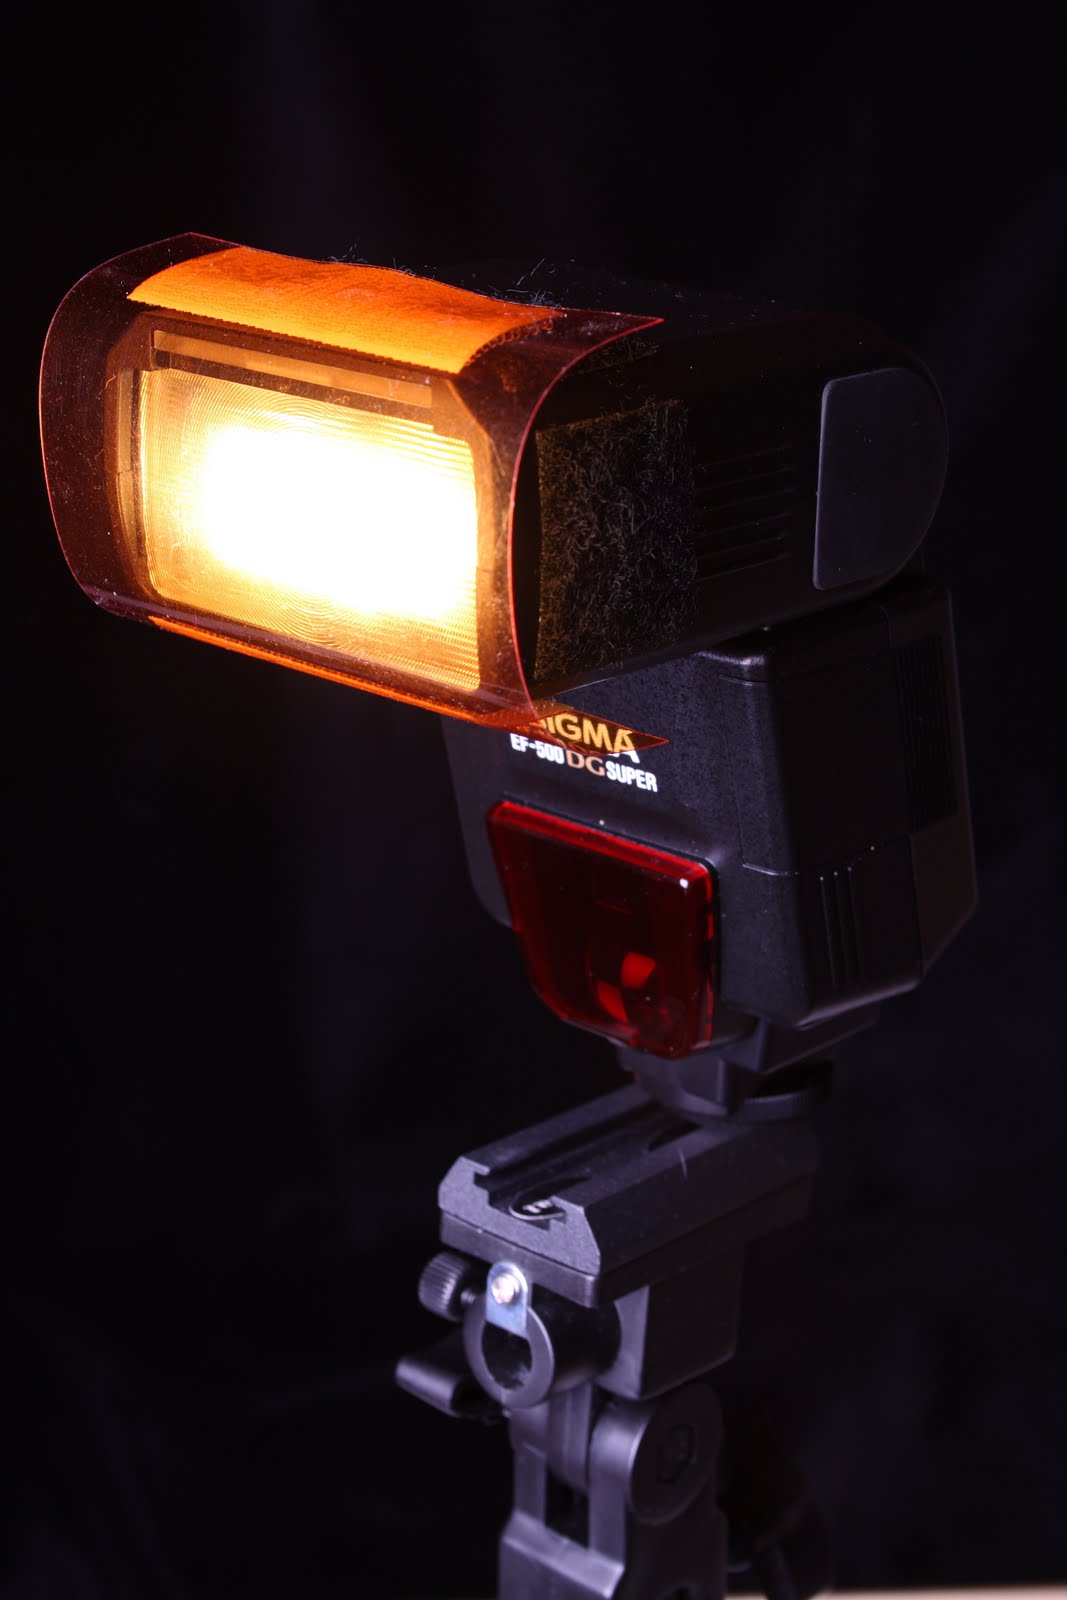
Just attach a gel and fire away. I like using the flash off-camera in optical slave mode so that I can use it to highlight a small area in a particular colour for a bit of drama. In the twin-lens camera shot below, my main strobe was used with an orange gel, and the flash with a blue filter off to the right provided the blue highlight.
Subscribe to:
Posts (Atom)