Tuesday 12 July 2016

Catching a Falling Star

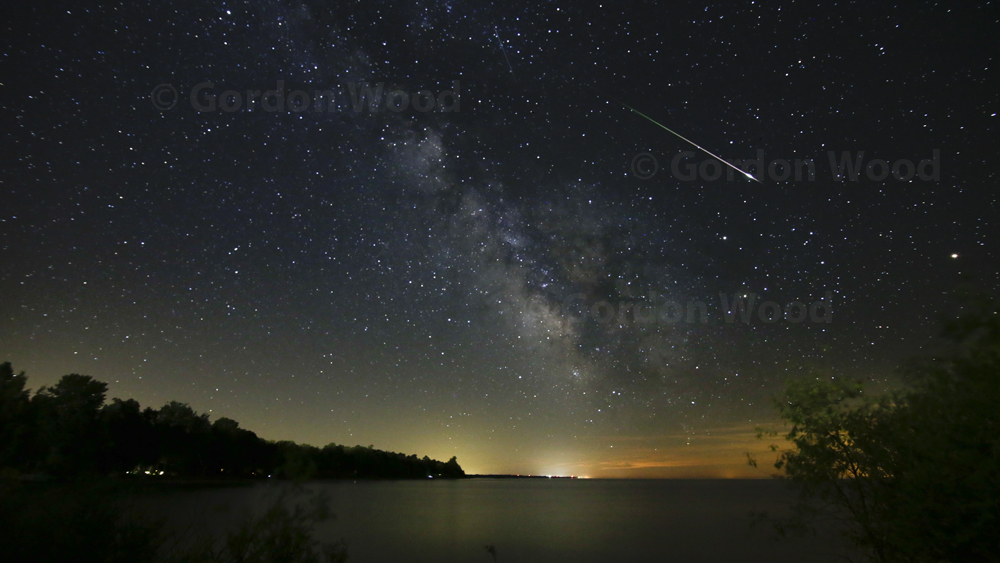
There I was at Point Clark, Ontario on the edge of Lake Huron with a friend, innocently taking a time lapse sequence of the gorgeous night sky. Just a few frames from the end of my 150-frame sequence, probably the brightest meteor I have seen in recent years streaked across the sky.

Since I was shooting 20-second exposures at ISO 3200, there was plenty of opportunity for the meteor’s short life span to be captured. I was just lucky, however, that it didn’t perform its burnout while my camera was taking a 5-second breather between shots.

My intent that night was to capture the elusive Milky Way. Not only did I get the best shots ever of the MW and its bright core, but to capture it and a meteor in one shot?….Serendipity.

Tick that box on my bucket list.


Monday 13 June 2016

TRY TIME EXPOSURES FOR ETHEREAL EFFECTS


When we think about taking long exposures with a camera, night time images usually come to mind. Only dark conditions generally call for slow shutter speeds, right?

True-but there is a way to take time exposures in broad daylight...with surprising results.

So the first question that comes to mind is: how do you take a long exposure in bright light? Won’t the camera try to set a fast shutter speed to ensure that the exposure is correct, regardless of how small the aperture is set?

Then there’s the other question: why would you want to take long exposures in daytime, anyway?

OK - a long time exposure (keeping the camera’s shutter open for a long time – from seconds to minutes) will occur when:

  • Light level is very low
  • A very small aperture is chosen, and
  • ISO is set to the lowest value that the camera will allow.

So, to answer the first question, you need to simulate low light conditions by giving your camera dark sunglasses. The device that will do this is an inexpensive thread-on piece of glass called a neutral density (ND) filter. These filters come in a wide variety of grades and are either specified in ‘stops’ or ‘times’.  They are also available as variable grade versions, often referred to as Fader NDs. Be sure to buy one that has the same filter thread diameter as your lens.

A one-stop (or two times) ND filter, with aperture and ISO remaining the same, will require that you force the shutter to stay open twice as long to get the same exposure as you would without the filter. Similarly, a two-stop filter will require slowing the shutter by four times, since a stop means a factor of two in exposure. For the kind of images I’m proposing we take, you will need a ten-stop filter in order to get exposures that are minutes long. This is equivalent to increasing exposure by a factor of 1024 times, but is usually referred to as a 1000 times filter.


Why minutes? Well, in answer to the second question above, anything moving (water, clouds) will take on a foggy (in the case of waves) or streaky (in the case of clouds) look. As long as you have stationary elements in the scene, such as rocks, ground and a tree trunk in the sample shots shown in this post, the viewer is confronted with a paradox that doesn’t appear ‘natural’. This makes for a more interesting image than if you had captured the same scene with a shutter speed of, say, 1/250th of a second. While these images were shot in colour, I converted them to black and white, since they tend to look more dramatic that way.

And now for the practical considerations. You will need:

  • A stable tripod
  • A remote shutter release that plugs into your camera, since you can’t hold down the shutter button on your camera for minutes without jarring it. You can also get an intervalometer, which allows you to set a specific time interval without having to manually time the shutter.
  • A camera with a Manual mode that will allow you to set the shutter to ‘Bulb’, or one that has a dedicated Bulb mode.
  • A day with calm winds, so that your tripod doesn’t get buffeted during the exposure.

Look for a scene that has a combination of moving and stationary components. Getting the right exposure is definitely going to take some experimentation. As a starting point, set your camera’s ISO to the lowest value it provides. This is typically 100. Do NOT use Auto ISO. In Manual / Bulb mode, set the aperture to a value anywhere in the range of f/16 to f/22. This will depend on whether it’s an overcast or sunny day. You should get exposures in the range of 2 to 4 minutes. Use the histogram to confirm good exposure and tweak the time (or aperture) as needed to get perfect exposure or desired motion effect.

With digital SLRs, a practical consideration is the heating of the sensor during long exposures. While it won’t damage the camera, this heating tends to amplify what are often referred to as ‘stuck pixels’. Every camera has them, and they appear as unexpected bright spots on the final image.

To combat this, DSLRs generally have a long exposure noise reduction setting which can mitigate this annoyance. Unfortunately, it requires that the camera will make you wait twice as long to see your image, since it takes as long again as the exposure time to process out the stuck pixels. This could result in an 8 minute wait until you take the next shot. While this technique is effective, I prefer to take my chances and fix the spots after in either Lightroom or Photoshop.

By way of a summary, here are the steps I take:

  1. Set up the camera on the tripod and compose the scene with the chosen lens.
  2. Ensure ISO is at its lowest setting, and choose a small aperture to help force a long exposure and to give me the depth of field I want.
  3. Plug in the remote shutter release or intervalometer (and set it to the exposure time I want).
  4. Thread on the ten-stop ND filter, being careful not to disturb focal length or focus settings.
  5. Cover up the eyepiece if the sun is behind me, to prevent light leak onto the image (it has happened to me!)
  6. Check my image and histogram, rinse and repeat until I get the right exposure and effect.

It’s a slow process that requires patience. At the end of it though, you will get images that will be set apart from the ordinary.

Thursday 18 February 2016

Get Amazing Depth of Field with Focus Stacking


When we think about creating a photograph with everything in sharp focus from a few centimetres in front of the lens out to the horizon, we immediately think that we will need to ‘stop down’ to an incredibly small aperture and focus at the hyperfocal distance. Unfortunately, that means we will have to use extremely long time exposures to make up for the light lost with the small aperture, and who knows where the hyperfocal distance is anyway!?

You could invest heavily in a tilt/shift lens instead, but there is a way to use your current lenses to get this result. I am going to describe the procedure on the assumption that Photoshop is available to you, but there are inexpensive software packages available as well to perform what is referred to as focus stacking (Google it).

Before we get to the software, let’s outline the image capture procedure. The idea is to capture a number of images of the same scene (a tripod is a must for this), successively refocusing from closeup to infinity in small steps. The successive images must overlap in terms of focus. For this reason, it would be wise to use a fairly small aperture (like f/16, if the light allows), in aperture priority or manual mode, to give each shot as wide a depth of field as possible. Small focus steps will ensure the in-focus zones from one shot to the next overlap each other. This will require some experimentation with your lens. Take as many shots as you want. This will guarantee a good result, and the software will have no problem handling them.

Note that as you refocus, the size of the image changes slightly. For that reason, the first job of the software is to align all of the shots based on their content. Because each shot contains zones that are out of focus, the next job of the software is to blend the images together while removing the defocused zones from each.

When aligning the shots, the software creates a layered file comprised of each shot on a different layer (hence the ‘stacking’ term). To eliminate the defocused zones, it adds a mask to each layer which blocks out these zones individually.

So here are the steps I use in Photoshop. It is possible to align and blend all shots at once, but I found it gave me screwy results. Instead, I do the following:

1.       Open all of the shots in your sequence (at the same time to save time)

2.       Select File > Automate > Photomerge.

3.       Under Layout in the dialog box, select Collage. Under Source Files click Add Open Files. Uncheck the Blend Images Together box (I do this to avoid the aforementioned screwy results). The software creates a new, layered ‘Panorama’ file with content on all layers now aligned. Note that you will probably have to crop the edges where overlap did not occur.

4.       Highlight all layers using Shift-Click or Ctrl-Click. Select Edit > Auto-Blend Layers…, then check the Stack Images radio button and OK.

Now here’s where it can get a little tricky. If you zoom in to the resultant image and find some soft-focused areas, it means Photoshop didn’t quite get the masks right in that area. If you find a number of these areas, the fix will take time and patience. You can turn layers on and off by clicking the eyeball icon on each layer. With all layers turned off except one, you will clearly see where the mask on that visible layer has eliminated part of that layer (checkerboarded areas). By stepping this way through all layers, you will see where the trouble spots are. You may need to erase these areas from one mask (where Photoshop has left in a defocused area) and add to the mask on another layer where that area is in focus.

How do you subtract from or add to a mask? Click on that mask (the rightmost rectangle on a layer), select the Brush tool from the tool palette and choose the white patch from the bottom of the palette, and paint the image. You will see this reveals more of the image on that layer; in other words, it is removing part of the mask. To cover up part of the image on a layer (in this case, a defocused area for instance), use a black brush. Adjust the size and hardness of the brush to get the desired control. As I said, this can involve a lot of work.

First Image in Sequence
The sample images here show the first and last images in a stack sequence, and the resultant focus-stacked image. The actual number of images in the stack was 11, but the first and last images demonstrate how the background and foreground, respectively, are distinctly out of focus.  All shots were made at f/6.3, so each has a shallow depth of field. Despite that, the resultant image looks terrific.

Last Image in Sequence
Of course, if you have decent light you could avoid using focus stacking by using a very small aperture such as f/22 and focusing at hyperfocal distance. But this too requires skill in determining the right focus point.

Focus stacking may be too over-the-top for many, but if you are passionate about pushing your photography up a notch, your efforts will be greatly rewarded by trying it.


Focus-Stacked Final Image