(Not to be confused
with crop circles)
A few months ago, I wrote about how sensor size affects the
way different cameras capture an image when using the same lens. To refine the
topic a bit further, I’m going to introduce two terms: crop factor and image
circles.
Why bother with this techno-babble? Well, as stated in the
earlier article, if you now own a consumer DSLR with an APS-C sized sensor,
chances are that when you want to replace it down the road, your next camera
will have a full frame sensor. This means that the lenses you have now are
going to behave differently on your future camera, or, worst case, will force
you to buy at least one new lens.
Now for my definitions:
Crop Factor – The ratio of
apparent magnification provided by the same lens when switching between two different-sized camera
sensors.
For example, a lens on an APS-C
sized sensor will produce an image that appears magnified by a factor of 1.6
times over the image captured by that same lens on a full frame sensor. The
actual image projected by the lens is the same in both cases (note that the
focal length of the lens is assumed to be fixed), but the smaller APS-C sensor
sees fractionally less of the projected image than the full frame sensor. In
effect, the APS-C sensor is ‘cropping’ the image, thereby giving the impression
that it is magnifying part of the image.
Image Circle – The diameter of a circular image projected by a lens
when focused on a surface. It is usually expressed in millimetres.
 In this context, the lens is
projecting the image from a scene in front of the camera onto the back of the
camera. At the back of the camera is the sensor. In order for the image to
fully cover the sensor, the image circle must be at least as large as the
diagonal measurement of the sensor. Otherwise, we would see a darkening in the
corners of the resulting image where the projected image didn’t fully cover the
sensor. This is called vignetting.
In this context, the lens is
projecting the image from a scene in front of the camera onto the back of the
camera. At the back of the camera is the sensor. In order for the image to
fully cover the sensor, the image circle must be at least as large as the
diagonal measurement of the sensor. Otherwise, we would see a darkening in the
corners of the resulting image where the projected image didn’t fully cover the
sensor. This is called vignetting.
One important fact to note is that lens manufacturers make
two different types of lenses for DSLRs: full frame and digital-only. For
example, Canon full frame lenses are designated EF and digital-only are
designated EF-S. They may have exactly the same focal length, but the
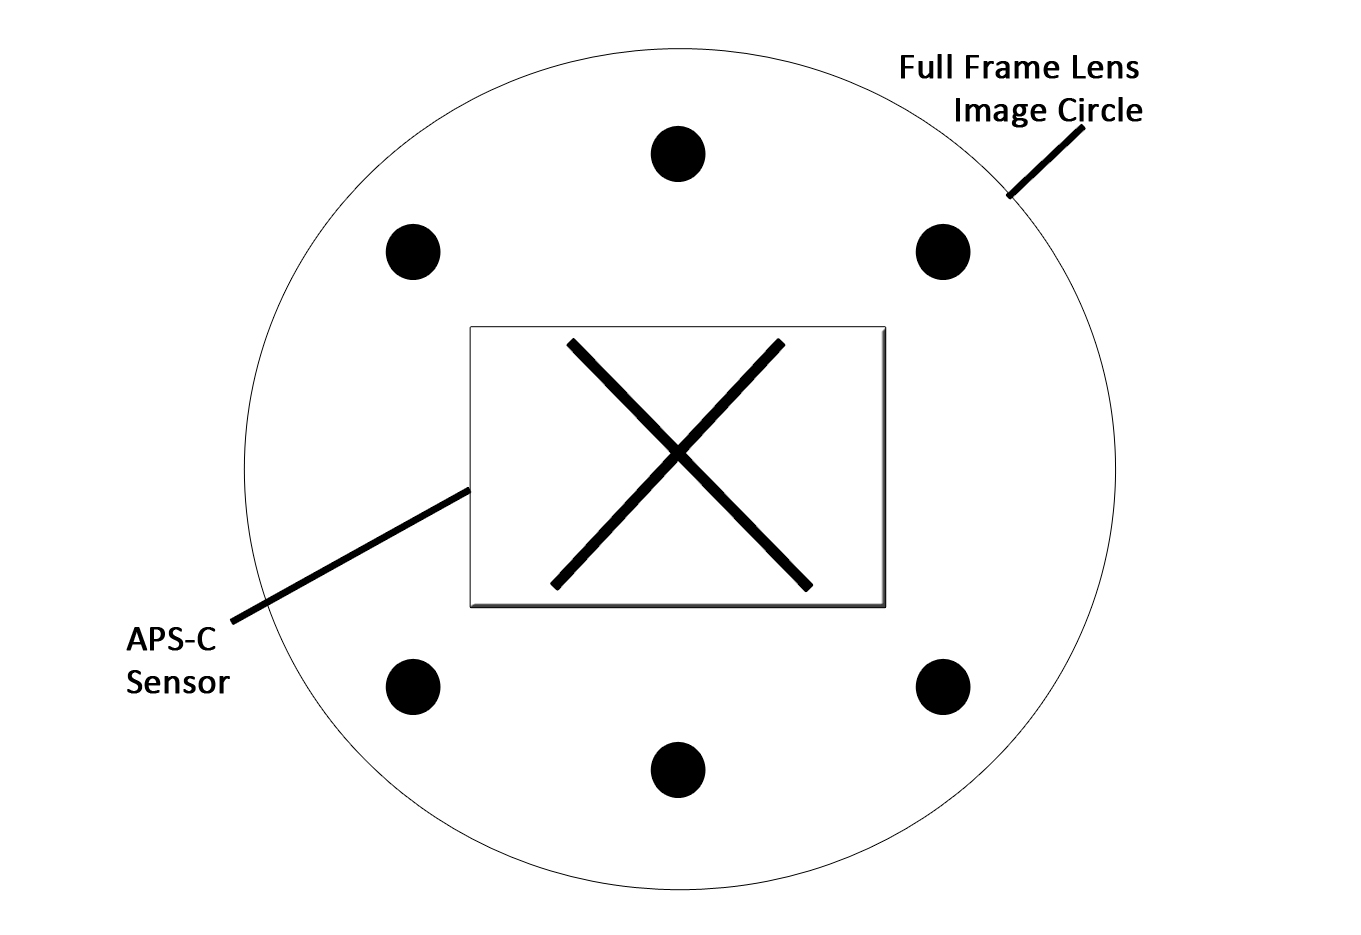
difference is that the full frame version projects a bigger image circle, more than sufficient to cover the full frame
sensor. The full frame version works fine on both full frame and APS-C cameras,
whereas the digital-only version would cause vignetting on the full frame
camera. Note: while the mounts look the same on the EF and EF-S lenses, there is a protruding 'shoulder' on the EF-S lenses that prevents you from mounting them on full frame cameras.
Now, you would be tempted to think that using a full frame
lens on an APS-C sensor when compared with the digital-only lens would result
in apparent magnification, just like the crop factor, because the smaller
sensor is only capturing part of the full frame lens image circle. An important
difference, however, is that if you looked at the projected images from the
full frame and digital-only lenses (with the same focal length) under the exact same conditions, an object
in the scene would be projected at
exactly the same size. Why? - because the full frame lens actually captures
a wider field of view. In other words, putting the full frame lens on an APS-C
camera will project peripheral information outside of the sensor, while the
digital-only lens will not project that peripheral information but will
adequately cover the sensor.
If that didn’t do it for you, here’s a scenario that might
explain the difference between crop factor and image circle. Hopefully, the accompanying graphics will help:
1. I have an APS-C sensor
DSLR in front of me. I also have two lenses – both are 50 mm focal length,
but one is designed for full frame and one is designed for digital-only. I
have the camera set up on a tripod aimed at an object (X) which sits in the
middle of the viewfinder. I try each of the lenses in turn and focus on
the X. I notice that the X appears to be the same size in each case, and
fills the frame from top to bottom. As long as the focal length on both
lenses is the same, there is no change to the size of the image or the
apparent angle of view in the captured image. The only difference is that
the full frame lens is projecting a bigger image circle with more peripheral information (the dots) that
the sensor doesn’t see anyway.
 2. I now take the full frame
50 mm lens and put it on a full frame sensor DSLR. The angle of view now
appears wider than it did on the APS-C camera and the X is smaller
(doesn’t fill the frame from top to bottom) by a factor of 1/1.6 (62.5%) because
of crop factor in reverse.
Saying it another way, the full frame lens now just covers the full frame
sensor as opposed to the APS-C sensor which cropped the full frame lens
image circle and caused apparent magnification. Again, focal length
remained the same, but sensor size
changed. Note that the full frame sensor captures some of the peripheral image (dots) that the APS-C sensor didn't.
2. I now take the full frame
50 mm lens and put it on a full frame sensor DSLR. The angle of view now
appears wider than it did on the APS-C camera and the X is smaller
(doesn’t fill the frame from top to bottom) by a factor of 1/1.6 (62.5%) because
of crop factor in reverse.
Saying it another way, the full frame lens now just covers the full frame
sensor as opposed to the APS-C sensor which cropped the full frame lens
image circle and caused apparent magnification. Again, focal length
remained the same, but sensor size
changed. Note that the full frame sensor captures some of the peripheral image (dots) that the APS-C sensor didn't.
 3. If I put the digital-only
50mm lens on the full frame camera (not generally possible as explained above), the object size is
the same as in 2., but I see severe vignetting in the corners. This is
because the image circle of the
digital-only lens is too small for the full frame sensor.
3. If I put the digital-only
50mm lens on the full frame camera (not generally possible as explained above), the object size is
the same as in 2., but I see severe vignetting in the corners. This is
because the image circle of the
digital-only lens is too small for the full frame sensor.
To tie this discussion up with a nice ribbon, we can summarize where crop factor and image circle come into play as follows:
- Crop factor is a consideration when using the same lens on two different cameras with different sensor sizes.
- Image circle is a consideration when using two different lenses with the same focal length but different image circle sizes on the same camera.
Taking this one step further, what if you had a full frame
DSLR, but you wanted to use a lens of the same focal length (ie. 50 mm) but
with a bigger image circle than the full frame lens provided? Those of us
geezers who used to use medium format film know that the lenses for those old
cameras projected an even bigger image circle than full frame DSLR lenses
because medium format film sizes were larger than a full frame sensor. So, as
long as you were comfortable shooting in manual mode, you can adapt your medium
format film lenses to your DSLR for reasonable cost. Why would you need a
bigger image circle if the full frame lens covered your sensor? Well, with a
bigger image circle, you can (with the right adapter) use tilt and shift
functions over a wider range than you could with a full frame lens.
But tilting and shifting is another subject for another blog
post….