Showing posts with label photograph. Show all posts

Tuesday, 12 July 2016

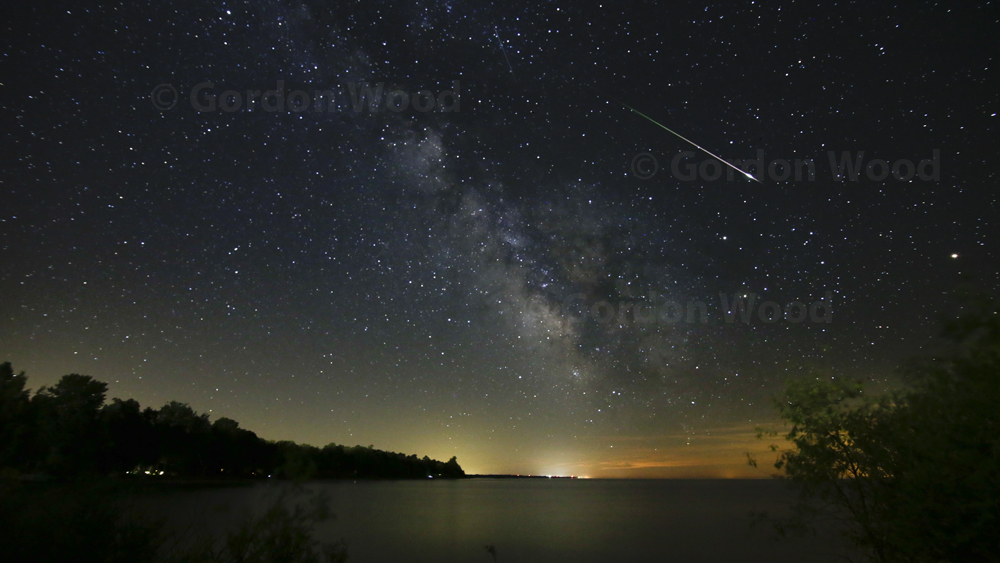
Catching a Falling Star

There I was at Point Clark, Ontario on the edge of Lake Huron with a friend, innocently taking a time lapse sequence of the gorgeous night sky. Just a few frames from the end of my 150-frame sequence, probably the brightest meteor I have seen in recent years streaked across the sky.

Since I was shooting 20-second exposures at ISO 3200, there was plenty of opportunity for the meteor’s short life span to be captured. I was just lucky, however, that it didn’t perform its burnout while my camera was taking a 5-second breather between shots.

My intent that night was to capture the elusive Milky Way. Not only did I get the best shots ever of the MW and its bright core, but to capture it and a meteor in one shot?….Serendipity.

Tick that box on my bucket list.


Monday, 13 June 2016

TRY TIME EXPOSURES FOR ETHEREAL EFFECTS


When we think about taking long exposures with a camera, night time images usually come to mind. Only dark conditions generally call for slow shutter speeds, right?

True-but there is a way to take time exposures in broad daylight...with surprising results.

So the first question that comes to mind is: how do you take a long exposure in bright light? Won’t the camera try to set a fast shutter speed to ensure that the exposure is correct, regardless of how small the aperture is set?

Then there’s the other question: why would you want to take long exposures in daytime, anyway?

OK - a long time exposure (keeping the camera’s shutter open for a long time – from seconds to minutes) will occur when:

  • Light level is very low
  • A very small aperture is chosen, and
  • ISO is set to the lowest value that the camera will allow.

So, to answer the first question, you need to simulate low light conditions by giving your camera dark sunglasses. The device that will do this is an inexpensive thread-on piece of glass called a neutral density (ND) filter. These filters come in a wide variety of grades and are either specified in ‘stops’ or ‘times’.  They are also available as variable grade versions, often referred to as Fader NDs. Be sure to buy one that has the same filter thread diameter as your lens.

A one-stop (or two times) ND filter, with aperture and ISO remaining the same, will require that you force the shutter to stay open twice as long to get the same exposure as you would without the filter. Similarly, a two-stop filter will require slowing the shutter by four times, since a stop means a factor of two in exposure. For the kind of images I’m proposing we take, you will need a ten-stop filter in order to get exposures that are minutes long. This is equivalent to increasing exposure by a factor of 1024 times, but is usually referred to as a 1000 times filter.


Why minutes? Well, in answer to the second question above, anything moving (water, clouds) will take on a foggy (in the case of waves) or streaky (in the case of clouds) look. As long as you have stationary elements in the scene, such as rocks, ground and a tree trunk in the sample shots shown in this post, the viewer is confronted with a paradox that doesn’t appear ‘natural’. This makes for a more interesting image than if you had captured the same scene with a shutter speed of, say, 1/250th of a second. While these images were shot in colour, I converted them to black and white, since they tend to look more dramatic that way.

And now for the practical considerations. You will need:

  • A stable tripod
  • A remote shutter release that plugs into your camera, since you can’t hold down the shutter button on your camera for minutes without jarring it. You can also get an intervalometer, which allows you to set a specific time interval without having to manually time the shutter.
  • A camera with a Manual mode that will allow you to set the shutter to ‘Bulb’, or one that has a dedicated Bulb mode.
  • A day with calm winds, so that your tripod doesn’t get buffeted during the exposure.

Look for a scene that has a combination of moving and stationary components. Getting the right exposure is definitely going to take some experimentation. As a starting point, set your camera’s ISO to the lowest value it provides. This is typically 100. Do NOT use Auto ISO. In Manual / Bulb mode, set the aperture to a value anywhere in the range of f/16 to f/22. This will depend on whether it’s an overcast or sunny day. You should get exposures in the range of 2 to 4 minutes. Use the histogram to confirm good exposure and tweak the time (or aperture) as needed to get perfect exposure or desired motion effect.

With digital SLRs, a practical consideration is the heating of the sensor during long exposures. While it won’t damage the camera, this heating tends to amplify what are often referred to as ‘stuck pixels’. Every camera has them, and they appear as unexpected bright spots on the final image.

To combat this, DSLRs generally have a long exposure noise reduction setting which can mitigate this annoyance. Unfortunately, it requires that the camera will make you wait twice as long to see your image, since it takes as long again as the exposure time to process out the stuck pixels. This could result in an 8 minute wait until you take the next shot. While this technique is effective, I prefer to take my chances and fix the spots after in either Lightroom or Photoshop.

By way of a summary, here are the steps I take:

  1. Set up the camera on the tripod and compose the scene with the chosen lens.
  2. Ensure ISO is at its lowest setting, and choose a small aperture to help force a long exposure and to give me the depth of field I want.
  3. Plug in the remote shutter release or intervalometer (and set it to the exposure time I want).
  4. Thread on the ten-stop ND filter, being careful not to disturb focal length or focus settings.
  5. Cover up the eyepiece if the sun is behind me, to prevent light leak onto the image (it has happened to me!)
  6. Check my image and histogram, rinse and repeat until I get the right exposure and effect.

It’s a slow process that requires patience. At the end of it though, you will get images that will be set apart from the ordinary.
Thursday, 26 September 2013

PERFECTING THE PANORAMIC


It’s getting easier to make panoramics with today’s cameras. Some will actually do the stitching together for you without the need for software. But unless you take control of the process, you may be selling yourself short on results.

Here is a checklist you can follow in preparation for shooting your panoramic. It may look a little daunting, but it will become old hat with a little practice:

  • Arrive Early   In order to get through this checklist, you’ll need the extra setup time before the light changes!
  • Use a Tripod   A panoramic is comprised of a series of adjacent photographs stitched together in software to form a single wide-angle image. In the stitching process, the software does its best to match adjacent images seamlessly, but there is usually a bit of twisting required to match them perfectly. This requires cropping the final panoramic. Unless the individual images are shot with the camera absolutely level, the twisting and subsequent cropping may get to the point where much of the scene is lost.
  • Level the Tripod and Camera  I have a bubble level on the base of my tripod which I use to get the legs levelled up first. I also use a bubble level that slips onto the camera’s hot shoe, which I use to do fine levelling adjustments. The reason for using both is that uneven legs may give me the impression that I have a level camera at one position, using the hot shoe level. But as I pan, I would likely see the level drift off centre. Once you have tweaked both the legs and the pan/tilt head, try panning through the intended range of your panoramic to ensure you have optimized both.
  • Set the Camera to Manual (M) mode   Imagine you’re shooting a panoramic made up of photos that have dramatically different light content. In any mode but Manual, each photo would be exposed differently because the light metering system built into your camera tries to set the exposure automatically to an average 18% grey level. In this scenario, the panoramic wouldn’t look right because the inherently darker scenes would be forced to look lighter compared to the others, resulting in a patchy-looking result. Sure, you could try matching the exposures in software before stitching, but it’s easier to get it right in the camera. I pan the entire scene first, using the digital meter to set a shutter speed/aperture combination that averages a normal exposure. As a result, some shots will be over-exposed slightly, others under. As long as the histograms for all photos don’t show any clipping at the black or white points, you’re OK.
    The Camera's Light Meter
    The camera's digital light meter. Zero is optimal exposure.


  •  Set the Camera ISO setting to a fixed value  Some cameras have Auto ISO setting. Per the last point about exposure, ensure you choose a fixed value (eg. 200) rather than Auto.
  • Set the Camera to manual focus  Most SLR lenses have a switch allowing you to disengage the motor that automatically focuses your lens before you take a shot. For panoramics, set it to manual focus (MF). The reason for this is that as you pan to take each of the shots, the camera may refocus on something close in or far away, especially if there’s an object in one of the shots that is prominent. That could result in uneven focus across the panoramic. Pick one focus setting that works for the whole panoramic and leave it there.
  • Take the Camera out of Auto White Balance  Similar to the argument in the last two points above, you don’t want the camera to change the colour balance as you pan because of changing content. Choose one of the presets instead of Auto. For instance, if shooting on an overcast day, use the Cloudy Bright setting. If shooting an indoor scene under fluorescent lights, use the Fluorescent setting. If you have access to a photo editing program that allows white balance adjustment, don’t worry about what preset you choose, because you can correct all the shots by the same amount if the preset you chose results in wonky colour.
  • Overlap the Photos  Panoramic software uses artificial intelligence to look for similarities between adjacent shots then join those features seamlessly. In order to provide those reference points, you need to provide overlap in content between adjacent shots. I typically overlap by 25%. If I start my panoramic on the left end then take subsequent shots by panning left to right, this means that my second photo contains the rightmost 25% of the first photo. I’ve made marks on my tripod head that tell me how far to pan before taking the next shot while allowing 25% overlap. I have marks for both landscape format and portrait formats. But, of course, those marks only work for one focal length, which brings me to the next point….
  • Use a “Normal” focal length  For a consumer digital SLR with an APS-C sensor, normal focal length is about 33mm. Anything shorter is considered wide angle. The wider you go, the more barrel or pincushion distortion will be introduced. This may make it harder for the stitching software to match the photos without twisting the photos to counter this effect. The more twisting, the more cropping of the final panoramic you’re likely to have to do. Of course, you could use a longer focal length without this concern, but remember that depth of field reduces with focal length.  I use a 35mm prime lens for panoramics, adapted from an old film camera.
  • Choose the Right Content  I like shooting sky panoramics. I found out the hard way that sometimes the stitching software will not work properly with some content – particularly soft images with few hard edges. Some sunset clouds fit that description. Sometimes, it helps to include some hard edge detail (like treetops) to assist in the stitching. You can always crop it out later.
  • 
  • Choose the Right Software  I find that the ‘premier’ photo editing package gives too many choices when creating panoramics. You have to try them all to find out which one works best, but my experience is that I generally don’t like any of the results. On the other hand, a cheap and cheerful package sometimes works better and with less fuss. I particularly like ArcSoft’s Panorama Maker, which came bundled free with my point-and-shoot camera.
 
 
3 overlapping images stitched together, before cropping. Note how the software has to distort the images to make them match up.


As you can see, the process of shooting panoramics like a pro is very manual. If you’re shooting a scene with moving clouds, set up marks on your tripod so you can rapidly make all your shots before the clouds change position and shape. And finally, resist the temptation to use more than 3 or 4 shots in a panoramic, because you’ll end up with a long, skinny picture sitting in the middle of your print that will look silly.

Wednesday, 7 November 2012

Size matters – in sensors, that is.


When digital SLRs started to come into the market, they essentially replaced the 35mm film camera. In most cases, the lenses that fit your 35mm camera could now be used on the new digitals (from the same manufacturer, of course) without the need for any adapters. Sweet.

Those who made this transition noticed something right away. The 50mm focal length lens that gave a ‘normal’ angle of view on their film camera now acted like an 80mm lens, or slight telephoto, when attached to the digital SLR. In other words, the image was now magnified compared to using the same lens on the 35mm camera.

In some ways this was a benefit, because it meant that the telephoto lens you bought for your 35mm camera now reached a bit further on the digital SLR– about 1.6 times further. The downside was that the wide angle lens that used to work beautifully for landscapes on your 35mm wasn’t so wide anymore on the digital.

This difference is attributable to the size of the sensor in the digital camera. Most consumer SLRs use an APS-C size sensor, which is 22mm x 15mm. Compare that to 35mm film at 36mm x 24mm. Given the same lens projecting the same ‘image circle’ on the digital sensor  and the 35mm negative, the digital sensor only captures part of what the negative captures. Essentially, the digital image is magnified (by 1.6 times) since it’s like zooming in on a small part of the image circle.

For years now, professionals who could afford it have been using full frame digital SLRs (example – the Canon 5D) which use a 36mm x 24mm sensor, just like the 35mm negative size. While the manufacturers could have stuffed more pixels into this bigger sensor (and did so to an extent), the big benefit is that they can now make the pixels bigger.

Why? The bigger the pixel, the more light it can gather, meaning the camera will yield less ‘noise’ in the image in low light situations. Overall, the image is cleaner and yes, at a somewhat higher resolution. In fact, Nikon recently introduced the full frame D800 with an astonishing 36 megapixel sensor. Compare that to the Canon 5D’s 22 megapixel resolution or 18 megapixels on most consumer SLRs. Of course, file sizes bloom with higher resolution.

All of this is significant because the prices of full frame camera bodies are starting to slide below the $2000 price point. While APS-C and other similar size sensors kick-started the digital photography revolution, affordable full frames will eventually bring it full circle. The smaller sensors won’t disappear for a while yet, but those of us who came up through the film world will once again be able to shoot the way we used to – only with the immediacy of digital and a moderate size hole in our pocket.

Wednesday, 22 August 2012

Extending Summer, Photographically


At this time of year, most of us are in denial that the long days, warm evenings and cricket sounds at night are soon going to fade into the cool of autumn.  While the change is inevitable, it’s nice to capture that summer feeling in our art and keep it in our walls year 'round. 
For me, the image shown here (Far and Away) brings on the warmth and color of the midsummer evening. This was shot with a long lens trained on a small island in Lake Erie. The trees almost seem to float above the water because the surface of the lake was calm around the island's shore.  A light ripple from the evening breeze creates a cyan reflection of the sky in the water in between, while the inshore water calms again and reflects the alpenglow-like color above the horizon. 
Swallows were constantly swooping over the lake surface, seeking mosquitoes for the evening meal. Waiting for them to get out of the frame required a bit of patience, but their presence was welcome nonetheless.  
To help visitors to my web site extend their summer by putting such scenes on their walls, I am offering a 20% discount until the end of September 2012.
Please go to http://bit.ly/SUswgc and simply use Discount Code PKGNDY at checkout. The discount can be used for any image on the web site.