Showing posts with label exposure. Show all posts

Tuesday, 12 July 2016

Catching a Falling Star

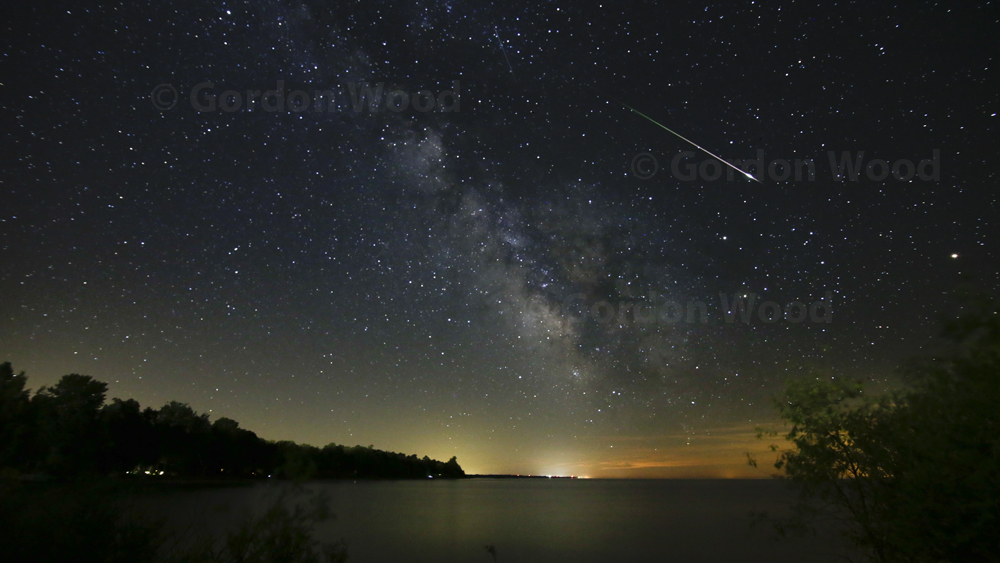
There I was at Point Clark, Ontario on the edge of Lake Huron with a friend, innocently taking a time lapse sequence of the gorgeous night sky. Just a few frames from the end of my 150-frame sequence, probably the brightest meteor I have seen in recent years streaked across the sky.

Since I was shooting 20-second exposures at ISO 3200, there was plenty of opportunity for the meteor’s short life span to be captured. I was just lucky, however, that it didn’t perform its burnout while my camera was taking a 5-second breather between shots.

My intent that night was to capture the elusive Milky Way. Not only did I get the best shots ever of the MW and its bright core, but to capture it and a meteor in one shot?….Serendipity.

Tick that box on my bucket list.


Monday, 13 June 2016

TRY TIME EXPOSURES FOR ETHEREAL EFFECTS


When we think about taking long exposures with a camera, night time images usually come to mind. Only dark conditions generally call for slow shutter speeds, right?

True-but there is a way to take time exposures in broad daylight...with surprising results.

So the first question that comes to mind is: how do you take a long exposure in bright light? Won’t the camera try to set a fast shutter speed to ensure that the exposure is correct, regardless of how small the aperture is set?

Then there’s the other question: why would you want to take long exposures in daytime, anyway?

OK - a long time exposure (keeping the camera’s shutter open for a long time – from seconds to minutes) will occur when:

  • Light level is very low
  • A very small aperture is chosen, and
  • ISO is set to the lowest value that the camera will allow.

So, to answer the first question, you need to simulate low light conditions by giving your camera dark sunglasses. The device that will do this is an inexpensive thread-on piece of glass called a neutral density (ND) filter. These filters come in a wide variety of grades and are either specified in ‘stops’ or ‘times’.  They are also available as variable grade versions, often referred to as Fader NDs. Be sure to buy one that has the same filter thread diameter as your lens.

A one-stop (or two times) ND filter, with aperture and ISO remaining the same, will require that you force the shutter to stay open twice as long to get the same exposure as you would without the filter. Similarly, a two-stop filter will require slowing the shutter by four times, since a stop means a factor of two in exposure. For the kind of images I’m proposing we take, you will need a ten-stop filter in order to get exposures that are minutes long. This is equivalent to increasing exposure by a factor of 1024 times, but is usually referred to as a 1000 times filter.


Why minutes? Well, in answer to the second question above, anything moving (water, clouds) will take on a foggy (in the case of waves) or streaky (in the case of clouds) look. As long as you have stationary elements in the scene, such as rocks, ground and a tree trunk in the sample shots shown in this post, the viewer is confronted with a paradox that doesn’t appear ‘natural’. This makes for a more interesting image than if you had captured the same scene with a shutter speed of, say, 1/250th of a second. While these images were shot in colour, I converted them to black and white, since they tend to look more dramatic that way.

And now for the practical considerations. You will need:

  • A stable tripod
  • A remote shutter release that plugs into your camera, since you can’t hold down the shutter button on your camera for minutes without jarring it. You can also get an intervalometer, which allows you to set a specific time interval without having to manually time the shutter.
  • A camera with a Manual mode that will allow you to set the shutter to ‘Bulb’, or one that has a dedicated Bulb mode.
  • A day with calm winds, so that your tripod doesn’t get buffeted during the exposure.

Look for a scene that has a combination of moving and stationary components. Getting the right exposure is definitely going to take some experimentation. As a starting point, set your camera’s ISO to the lowest value it provides. This is typically 100. Do NOT use Auto ISO. In Manual / Bulb mode, set the aperture to a value anywhere in the range of f/16 to f/22. This will depend on whether it’s an overcast or sunny day. You should get exposures in the range of 2 to 4 minutes. Use the histogram to confirm good exposure and tweak the time (or aperture) as needed to get perfect exposure or desired motion effect.

With digital SLRs, a practical consideration is the heating of the sensor during long exposures. While it won’t damage the camera, this heating tends to amplify what are often referred to as ‘stuck pixels’. Every camera has them, and they appear as unexpected bright spots on the final image.

To combat this, DSLRs generally have a long exposure noise reduction setting which can mitigate this annoyance. Unfortunately, it requires that the camera will make you wait twice as long to see your image, since it takes as long again as the exposure time to process out the stuck pixels. This could result in an 8 minute wait until you take the next shot. While this technique is effective, I prefer to take my chances and fix the spots after in either Lightroom or Photoshop.

By way of a summary, here are the steps I take:

  1. Set up the camera on the tripod and compose the scene with the chosen lens.
  2. Ensure ISO is at its lowest setting, and choose a small aperture to help force a long exposure and to give me the depth of field I want.
  3. Plug in the remote shutter release or intervalometer (and set it to the exposure time I want).
  4. Thread on the ten-stop ND filter, being careful not to disturb focal length or focus settings.
  5. Cover up the eyepiece if the sun is behind me, to prevent light leak onto the image (it has happened to me!)
  6. Check my image and histogram, rinse and repeat until I get the right exposure and effect.

It’s a slow process that requires patience. At the end of it though, you will get images that will be set apart from the ordinary.
Thursday, 22 January 2015

INFRARED ON THE CHEAP

We've all seen the articles stating that you can get otherworldly infrared effects by having a little irreversible surgery done to your DSLR sensor. Without a special filter that's mounted in front of the camera's CMOS sensor, infrared light would normally spoil your images. So, in order to invite infrared light in, the filter needs to be removed. Not willing to dedicate a DSLR to infrared-only, I looked for other ways to easily get on the infrared bandwagon.

As I still occasionally shoot with medium format black and white film, the obvious thing for me was to get some infrared-sensitive film and a recommended filter. This filter is a deep red filter that favours light with wavelengths of 720 nanometers or longer. If this is sounding too techie and out of your league - hang in there - I have a simple digital solution.


By taking that same filter and holding it in front of my CCD sensor-based point and shoot camera, I was astounded at how well the infrared effect came through. Now, in colour, the image does look ethereal, but predominantly red. My preference is to either switch the camera to monochrome before taking the shot, or convert to black and white after in software. After shooting the same scenes using this technique and then using the film camera with the same filter, the results are surprisingly similar.

The reason that the CCD sensor works is that it doesn't have the infrared-removing filter that's built onto CMOS sensors. So, by using a deep red filter in front of a CCD camera lens, you are filtering out much of the visible light and letting mainly infrared light hit the sensor. Using the filter in front of my CMOS-based DSLR camera, however, I verified that the infrared effect is not really achievable.

What about using smartphone cameras with this method? Unfortunately, the newer phones seem to be equipped with CMOS sensors, so they're generally not a good candidate.

You may be wondering by now what this "infrared effect" is that I've been blathering on about. Simply, if you take picture through a deep red filter onto either infrared film or a CCD sensor on a sunny day, the vegetation (leaves, grass) will appear white or pale. It gives the impression that frost or snow has settled on the trees and lawn. At the same time, the sky appears dark, giving a dramatic contrasty scene.

Have a look at the two images in this post, both shot in summer with my point and shoot camera and the deep red filter. Have a tripod handy, though. The filter gives 5-6 stops of attenuation, meaning exposures are going to be very long.

Thursday, 26 September 2013

PERFECTING THE PANORAMIC


It’s getting easier to make panoramics with today’s cameras. Some will actually do the stitching together for you without the need for software. But unless you take control of the process, you may be selling yourself short on results.

Here is a checklist you can follow in preparation for shooting your panoramic. It may look a little daunting, but it will become old hat with a little practice:

  • Arrive Early   In order to get through this checklist, you’ll need the extra setup time before the light changes!
  • Use a Tripod   A panoramic is comprised of a series of adjacent photographs stitched together in software to form a single wide-angle image. In the stitching process, the software does its best to match adjacent images seamlessly, but there is usually a bit of twisting required to match them perfectly. This requires cropping the final panoramic. Unless the individual images are shot with the camera absolutely level, the twisting and subsequent cropping may get to the point where much of the scene is lost.
  • Level the Tripod and Camera  I have a bubble level on the base of my tripod which I use to get the legs levelled up first. I also use a bubble level that slips onto the camera’s hot shoe, which I use to do fine levelling adjustments. The reason for using both is that uneven legs may give me the impression that I have a level camera at one position, using the hot shoe level. But as I pan, I would likely see the level drift off centre. Once you have tweaked both the legs and the pan/tilt head, try panning through the intended range of your panoramic to ensure you have optimized both.
  • Set the Camera to Manual (M) mode   Imagine you’re shooting a panoramic made up of photos that have dramatically different light content. In any mode but Manual, each photo would be exposed differently because the light metering system built into your camera tries to set the exposure automatically to an average 18% grey level. In this scenario, the panoramic wouldn’t look right because the inherently darker scenes would be forced to look lighter compared to the others, resulting in a patchy-looking result. Sure, you could try matching the exposures in software before stitching, but it’s easier to get it right in the camera. I pan the entire scene first, using the digital meter to set a shutter speed/aperture combination that averages a normal exposure. As a result, some shots will be over-exposed slightly, others under. As long as the histograms for all photos don’t show any clipping at the black or white points, you’re OK.
    The Camera's Light Meter
    The camera's digital light meter. Zero is optimal exposure.


  •  Set the Camera ISO setting to a fixed value  Some cameras have Auto ISO setting. Per the last point about exposure, ensure you choose a fixed value (eg. 200) rather than Auto.
  • Set the Camera to manual focus  Most SLR lenses have a switch allowing you to disengage the motor that automatically focuses your lens before you take a shot. For panoramics, set it to manual focus (MF). The reason for this is that as you pan to take each of the shots, the camera may refocus on something close in or far away, especially if there’s an object in one of the shots that is prominent. That could result in uneven focus across the panoramic. Pick one focus setting that works for the whole panoramic and leave it there.
  • Take the Camera out of Auto White Balance  Similar to the argument in the last two points above, you don’t want the camera to change the colour balance as you pan because of changing content. Choose one of the presets instead of Auto. For instance, if shooting on an overcast day, use the Cloudy Bright setting. If shooting an indoor scene under fluorescent lights, use the Fluorescent setting. If you have access to a photo editing program that allows white balance adjustment, don’t worry about what preset you choose, because you can correct all the shots by the same amount if the preset you chose results in wonky colour.
  • Overlap the Photos  Panoramic software uses artificial intelligence to look for similarities between adjacent shots then join those features seamlessly. In order to provide those reference points, you need to provide overlap in content between adjacent shots. I typically overlap by 25%. If I start my panoramic on the left end then take subsequent shots by panning left to right, this means that my second photo contains the rightmost 25% of the first photo. I’ve made marks on my tripod head that tell me how far to pan before taking the next shot while allowing 25% overlap. I have marks for both landscape format and portrait formats. But, of course, those marks only work for one focal length, which brings me to the next point….
  • Use a “Normal” focal length  For a consumer digital SLR with an APS-C sensor, normal focal length is about 33mm. Anything shorter is considered wide angle. The wider you go, the more barrel or pincushion distortion will be introduced. This may make it harder for the stitching software to match the photos without twisting the photos to counter this effect. The more twisting, the more cropping of the final panoramic you’re likely to have to do. Of course, you could use a longer focal length without this concern, but remember that depth of field reduces with focal length.  I use a 35mm prime lens for panoramics, adapted from an old film camera.
  • Choose the Right Content  I like shooting sky panoramics. I found out the hard way that sometimes the stitching software will not work properly with some content – particularly soft images with few hard edges. Some sunset clouds fit that description. Sometimes, it helps to include some hard edge detail (like treetops) to assist in the stitching. You can always crop it out later.
  • 
  • Choose the Right Software  I find that the ‘premier’ photo editing package gives too many choices when creating panoramics. You have to try them all to find out which one works best, but my experience is that I generally don’t like any of the results. On the other hand, a cheap and cheerful package sometimes works better and with less fuss. I particularly like ArcSoft’s Panorama Maker, which came bundled free with my point-and-shoot camera.
 
 
3 overlapping images stitched together, before cropping. Note how the software has to distort the images to make them match up.


As you can see, the process of shooting panoramics like a pro is very manual. If you’re shooting a scene with moving clouds, set up marks on your tripod so you can rapidly make all your shots before the clouds change position and shape. And finally, resist the temptation to use more than 3 or 4 shots in a panoramic, because you’ll end up with a long, skinny picture sitting in the middle of your print that will look silly.

Wednesday, 8 May 2013

Meter this.

We’ve all seen the portrait photographer holding a white-domed object next to the subject’s face to take a light reading. So why is that being done? Why not just let the camera do its automatic exposure thing and take the picture?


It’s a good question in this digital age, where we can instantly review our shots to see if we need to re-shoot with a little exposure compensation. After all, the histogram in the camera tells us just about everything we need to know about the exposure in the shot – is it under- or over-exposed and is the exposure evenly distributed over the entire tonal range?

The short answer is that the handheld meter is mostly used to measure the light falling on the subject from studio strobes or flashes mounted off-camera.  In this scenario, the camera doesn’t typically have the ability to control the flash output, as it does in ETTL mode when the flash is mounted on the camera’s hot shoe.  Hence, studio photographers usually work with the camera in manual exposure mode, where they manually set the shutter speed to a value that will synchronize with the flash and the aperture to a value that gives the correct exposure. Alternatively, they can use the  meter reading to set the brightness of each flash in a multi-light setup to give a particular effect while ensuring a proper exposure.

Here, I’ve used the words ‘light falling on the subject’, meaning incident light. Hence, the incident light handheld meter measures the ambient light and ignores how much light the subject is likely to reflect.  The metering system in our camera, on the other hand, does rely on the light reflected from the subject to determine exposure.

Which is more accurate? The incident meter is, because it is calibrated so that it will give camera settings to make an 18% grey card look like 18% grey (middle mark on the histogram) when photographed.  The reflected meter, however, relies on the subject's tone averaging out to 18% grey in order for the exposure to be accurate. If the subject is overly dark or bright (such as a snow scene), the reflected meter gets fooled because it tells the camera to expose as if the subject is mid-grey. The incident meter would read the light falling on the snow rather than the light reflected from it, thereby resulting in the snow looking like bright white snow rather than grey slush.

I started out stating that the incident meter is used in the studio to measure the light from strobes or flashes, but obviously it has a function in outdoor ambient (continuous) light photography as well. Some photographers work in manual exposure mode all the time and therefore rely on an incident meter for camera settings.

So why bother? Part of the answer may be a throwback to the film days, where you never knew until it was developed whether you got the exposure right or not. An incident meter (and a little exposure  bracketing) gave you the confidence that you got the shot. That way of working may still influence the photographer who has made the transition to digital, partly because it’s good practice.

The bottom line, though, is that anyone seriously considering turning pro using studio lighting setups should consider working with a combination flash/continuous incident meter, if for no other reason than to save time. The alternative is to shoot, tweak, shoot and then tweak some more.

Combination meters can be a bit of an investment, so they’re not for everyone.  If you’ve got the spare change, though, a meter can help you understand the exposure mystery a little better and hit the bullseye every time.

Friday, 7 December 2012

NEW LIGHTING COURSE IN 2013

Many people have taken my Digital Photography for Beginners course to overcome their reluctance to take their camera out of Auto mode and take control of exposure and depth of field.

For those who are starting to feel comfortable with their camera's creative modes and now want to take portraits or product shots aided by low cost lighting equipment, this 3-hour course should fit the bill.

Dubbed 'Lighting for the Beginner Photographer', the course provides plenty of hands-on practice using equipment the student may not yet own. All that is required is to bring along a digital SLR and to have an understanding of the basic concepts in the Digital Photography for Beginners course. You can also bring a hot-shoe flash if you have one.This is taught in my home in London, Ontario.

To register for the course, please visit http://filmscapes.ca/html/photography_courses.html

Here is an outline of the course (subject to change):


1.       The Camera’s Creative Modes

a.       Review of Aperture Priority, Shutter Priority, Program and Manual Modes

b.      When to use these modes in available light

c.       When to use these modes with fill flash (built in to the camera or external)

d.      Taking control of light and depth of field in the studio with Manual mode

e.      Flash sync and its relationship to maximum shutter speed

PRACTICE: Using fill flash in various creative modes. Observing shutter speed limitations with flash.

2.       Light Sources and Exposure

a.       The meaning of colour temperature and its relationship to outdoor and artificial light

b.      Selecting white balance for the light source (outdoor light/flash/indoor lighting)

                                                               i.      Preset vs. auto white balance

                                                             ii.      Custom white balance: when to use and how to set it

c.       The hot-shoe flash vs. the built-in flash

d.      Strobes (optional)

e.      Continuous (hot) lights

f.        Guide Numbers and Watt-Seconds

g.       Use of the light/flash meter (optional)

h.      Camera metering modes

i.         The histogram as an exposure tool and the meaning of 18% grey

PRACTICE: Experimenting with White Balance presets. Setting a custom white balance. Shooting without flash using various metering modes and comparing results in the histograms.

3.       Remote Triggering of Flash/Strobe

a.       Radio triggers and adapters for flash mounted on light stand

b.      Optical triggering

c.       Controlling the flash in manual mode

d.      Controlling the strobe output (optional)

PRACTICE: Setting remote flash output. Triggering from camera with radio trigger or optically from camera’s flash.

4.       Introduction to Light Diffusers and Reflectors

a.       Umbrellas

b.      Soft Boxes for strobes and hot-shoe flash

c.       Reflectors and Absorbers: outdoors with/without flash; in the studio

d.      Diffusers for harsh daylight

PRACTICE: Take a portrait shot/object shot with remote flash, with and without umbrella Repeat using available light and reflector, then diffuser.

5.       Basic Portraiture Methods

a.       Background stands

b.      Choice of material and colour for the type of shoot (including green screen)

c.       The role of depth of field and lens choice

d.      Using natural light

e.      The single light setup

f.        The two light setup

g.       Balancing sources for intensity

h.      Mixed light sources and the importance of custom white balance

PRACTICE:

-          Portraiture/object shoot using window light and choice of background (try black then white)

-          Portraiture/object shoot using window light, reflector and/or absorber and choice of background

-          Portraiture/object shoot using window light and single hair light (custom white balance)

-          Portraiture/object shoot using single light in studio setting (custom white balance)

-          Portraiture/object shoot using two lights with umbrellas/soft boxes in studio setting (custom white balance)

-          Experiments with other combinations

Monday, 30 April 2012

Getting Exposure Right

For those of you who attended one of my beginner digital photography courses, you may recall me harping on about the camera's metering always trying to achieve 18% grey average exposure.

So what does that mean, really? Well, if you were to examine the histogram (that funny looking graph on your camera's LCD screen) for a picture you just took, 18% grey falls smack dab in the middle. When your camera evaluates the light in the scene before you take the shot, it measures the light over several points in the scene and makes a decision about the settings required to make the average value of the exposure fall at the middle of the histogram. This is called evaluative (Canon) or matrix (Nikon) metering.


The reason for this is to try to ensure that the shadow and highlight areas of the scene remain within the left and right ends of the histogram to prevent loss of detail. Remember, the left end of the histogram represents the darkest shadow detail that the camera can capture, while the right end represents the brightest highlight it can handle. If the histogram is not centred, and the graph is rammed against one end or the other, then chances are you've lost some detail. In short, the best histogram is one whose graph trails off smoothly at both ends, barely touching the sides.

There are times when this brainwork by the camera can do a disservice, however. If you're shooting a scene that's 90% snow or white sand, for example, the camera will try to average the exposure to 18% grey. That means your snow or sand comes out a dull grey because it dominates the exposure, and the camera wants to expose it to mid-grey. Not only that, but if there is some deep shadow detail in that remaining 10% of the scene, it may be pushed against the left end of the histogram and be lost.

Knowing this, camera manufacturers provide an exposure compensation button, pictured below. Typically, you push and hold this button while you turn the command wheel and read the exposure compensation on the LCD screen. In the snow scene example, you may need to overexpose (+) by 1 to 2 stops. Now you're ready to take the shot and check the resultant histogram to see if the white end of the graph ends up close to, but not touching, the right end of the histogram. If not, adjust the exposure compensation and try again.

Remember, most cameras do not reset exposure compensation to zero after you turn off the camera. Reset it manually to ensure you don't wreck the next day's shoot.


You can also use the camera's other metering modes, such as partial or spot, to meter the light only in the very centre of the scene. A typical use for these is where you are taking a picture of someone who has a strong backlight directly behind them. Evaluative or matrix metering would read the backlight and most likely make the face very dark. You could use exposure compensation in this scenario, but partial or spot metering will do the same thing by measuring the light reflected from the face (assuming you centre it in the viewfinder) and make it mid-grey. Again, in these metering modes, the camera takes what it measures and tries to average the exposure to 18% (mid) grey.

As with exposure compensation, don't forget to reset the metering to evaluative or matrix when you're finished with partial or spot metering.