Showing posts with label image circle. Show all posts

Monday, 12 October 2015

Sharpness and Contrast: Lenses Compared


There is a vast range of pricing in lenses, so I decided to find out for myself if the most expensive lenses are really any better.

High up in this rank is the name Zeiss, and yes, the prices are out of reach for most of us. So, rather than take a chance on potential high-priced disappointment through a purchase, I decided to rent a Zeiss ZE 85mm f/1.4 Planar T for the weekend.

NOTE: Not all Zeiss lenses are more expensive than the camera manufacturers' own lenses. In fact, the Zeiss Planar lens tested here is actually cheaper by far than Canon's 85mm f/1.2 L series. The Zeiss OTUS 85mm f/1.4 lens,  however, is more than twice the price of the Canon.

My plan was to test it on my Canon 6D against the Canon 24-105mm L series zoom set to about 85mm focal length and a Mamiya M645 55mm f/2.8 medium format lens through an adaptor. Right off the bat, I must point out that it is a bit unfair to compare the 24-105 zoom against prime lenses, but after all, it is an L series lens that Canon touts as very high quality.

Also, since the Mamiya has a larger image circle than the other lenses, which were designed for a full frame sensor, only the centre portion of the Mamiya’s projected image was being used. As we know, aberrations are more pronounced at the edges, so the Mamiya has the advantage of having only its sharpest central area used in the comparison.

The test was not a rigorous scientific one. I used a test chart downloaded from the Internet for my basic comparison of resolution and contrast, then took a few outdoor shots for a more subjective head-to-head. I tried to frame up the shots the same in each case, since I was using different focal lengths (85mm and 55mm). That way, the necessity of unfairly having to enlarge the 55mm shots (and enlarging the apparent pixel size) would create a disadvantage for the Mamiya lens. Similarly, I tried matching the exposures in the camera as much as possible, but inevitably, a bit of exposure tweaking in post was needed to align the white end of the histograms. I felt this was necessary to get a fair comparison of contrast.

Test Chart Results Compared
I must preface this comparison by saying that focus is critical for a fair comparison, and I can’t guarantee that in each case I was perfectly focused. I did, however, choose the shots out of many iterations that I think represented the best focus for each lens.

The images compared here were all cropped from 100% views in Photoshop. At 100% , you are very close to seeing the limitation of the sensor in resolving detail, so even a premium lens may not seem razor sharp at such magnification.

Having said that, and with focus differences aside, the comparison is fair. Looking at the chart centre comparisons below, the Zeiss and the Mamiya seem to be comparable on a sharpness basis, while the Canon is slightly softer. This is most apparent in the fine rings in the ‘bullseye’, and in the vertical tapered stripes (next to the 16, 18, 20 marks on the right) where the Canon looks a little mushy. In fact, the Mamiya seems to have the best contrast in that zone, but critical focusing may have given it a slight advantage over the Zeiss.


Zeiss - test chart centre
 
Mamiya -test chart centre
Canon - test chart centre
Strangely, the Canon seems to give the best contrast with blacker blacks, which I would have expected the Zeiss to excel at. This, however, may be due to the fact that the Canon was not resolving the faint dot pattern (from printing the chart) that made up the black areas, and was blocking them in as solid black. Keep in mind also that the exposure was tweaked on each to ensure the white area in the centre of the ‘bullseye’ was matched across all three in terms of intensity to allow a comparison of blacks, and thus contrast.

The corner comparisons are where the differences became apparent. While both the Zeiss and the Mamiya (ignoring the chart tilt) maintained nice right angled corners, the Canon showed flawed geometry. In addition, the Canon also went very soft. Again, perhaps it’s unfair to compare a zoom's performance versus a prime's, but it’s convincing enough to make you think twice about using a zoom in a critical shoot. Also, we don’t know how the Mamiya would stack up against the Zeiss in the corners, because we’re really only using the centre portion of the Mamiya’s image circle. While very subtle, I would say the Zeiss was slightly sharper than the Mamiya in this area.

Zeiss - test chart corner
Mamiya - test chart corner
Canon - test chart corner
Subjective Outdoor Results Compared
Ok – this is where it gets even less scientific, but after all, the subjective result is probably what will convince you whether or not a particular lens will work for your type of photography.

For this comparison I used a population of one (scene, that is). Not totally representative of what a lens can capture, of course, but time eludes me on this little project.

A tripod was used to centre on the same flower bud, but slight tweaks on tripod height and position, to frame all three shots equally to compensate for focal length differences, resulted in slight differences in perspective. In Photoshop I also tried to equalize white balance and exposure.


To me, the Zeiss is the winner in this scenario. While the Mamiya appears to be comparable in sharpness (using the little hairs on the leaves as a reference), the contrast overall is stronger on the Zeiss. While the Canon’s contrast seems comparable to the Zeiss’, its sharpness didn’t stack up to either the Mamiya's or the Zeiss'.
Conclusions: Are the elite lenses  worth the coin?
From the moment that you first look through the Zeiss and examine the first shot, the reaction is “Wow – this is a nice lens”. After all, the heft of the all-metal barrel and the size of the glass definitely give you the impression of quality.

Before succumbing to the desire to just buy it no matter the cost, soberly think about your budget and the type of shooting you do. If you do high end portraiture or regularly sell landscapes through galleries, you can probably afford to cut to the chase and buy the best. On the other hand, if photography is a part-time money-maker, or even just your obsession, the budget-conscious do have more affordable alternatives.

I should make one other point. While the maximum aperture of the Zeiss was a lovely f/1.4, every lens performs at its worst, aberration-wise, at maximum aperture. While bokeh is gorgeous at f/1.4, there was a definite soft-focus look at that aperture. Subjectively, I don’t think the lens cleaned up until about f/2.8. That’s ok, because the brighter the maximum aperture, the sooner you achieve optimum performance when you stop down.  Bokeh still looks great at f/2.8, whereas a lens that has a maximum  aperture of f/2.8 may not perform will until you stop down to f/5.6 or smaller.

For my budget, the Zeiss are tempting, but a little too rich. I would prefer to  find used medium format lenses and adapt them to the 6D, because both the test chart and subjective comparisons show that the sharpness (while perhaps not the contrast) compare favourably to the Zeiss. One caveat: medium format lenses are somewhat vintage. Be sure to confirm that there are no signs of yellowing or coating separation on the glass before making your purchase from afar on eBay or other sites.

As a final note, don't discount vintage 35mm film lenses (with appropriate adaptors). I was going to include one in this review, but felt I needed to pull in the reins. Subjectively, I can tell you the Asahi Pentax 55mm f/2 I have was as sharp as the Mamiya and Zeiss at the centre. I suspect corner performance may not be as good, though. But for the price......

Sunday, 24 February 2013

Lenses for the DSLR: Crop Factor and Image Circles


(Not to be confused with crop circles)
 
A few months ago, I wrote about how sensor size affects the way different cameras capture an image when using the same lens. To refine the topic a bit further, I’m going to introduce two terms: crop factor and image circles.
Why bother with this techno-babble? Well, as stated in the earlier article, if you now own a consumer DSLR with an APS-C sized sensor, chances are that when you want to replace it down the road, your next camera will have a full frame sensor. This means that the lenses you have now are going to behave differently on your future camera, or, worst case, will force you to buy at least one new lens.
Now for my definitions:

Crop Factor – The ratio of apparent magnification provided by the same lens when switching between two different-sized camera sensors.

For example, a lens on an APS-C sized sensor will produce an image that appears magnified by a factor of 1.6 times over the image captured by that same lens on a full frame sensor. The actual image projected by the lens is the same in both cases (note that the focal length of the lens is assumed to be fixed), but the smaller APS-C sensor sees fractionally less of the projected image than the full frame sensor. In effect, the APS-C sensor is ‘cropping’ the image, thereby giving the impression that it is magnifying part of the image.

Image Circle – The diameter of a circular image projected by a lens when focused on a surface. It is usually expressed in millimetres.

In this context, the lens is projecting the image from a scene in front of the camera onto the back of the camera. At the back of the camera is the sensor. In order for the image to fully cover the sensor, the image circle must be at least as large as the diagonal measurement of the sensor. Otherwise, we would see a darkening in the corners of the resulting image where the projected image didn’t fully cover the sensor. This is called vignetting.

One important fact to note is that lens manufacturers make two different types of lenses for DSLRs: full frame and digital-only. For example, Canon full frame lenses are designated EF and digital-only are designated EF-S. They may have exactly the same focal length, but the difference is that the full frame version projects a bigger image circle, more than sufficient to cover the full frame sensor. The full frame version works fine on both full frame and APS-C cameras, whereas the digital-only version would cause vignetting on the full frame camera. Note: while the mounts look the same on the EF and EF-S lenses, there is a protruding 'shoulder' on the EF-S lenses that prevents you from mounting them on full frame cameras.
Now, you would be tempted to think that using a full frame lens on an APS-C sensor when compared with the digital-only lens would result in apparent magnification, just like the crop factor, because the smaller sensor is only capturing part of the full frame lens image circle. An important difference, however, is that if you looked at the projected images from the full frame and digital-only lenses (with the same focal length) under the exact same conditions, an object in the scene would be projected at exactly the same size. Why? - because the full frame lens actually captures a wider field of view. In other words, putting the full frame lens on an APS-C camera will project peripheral information outside of the sensor, while the digital-only lens will not project that peripheral information but will adequately cover the sensor.

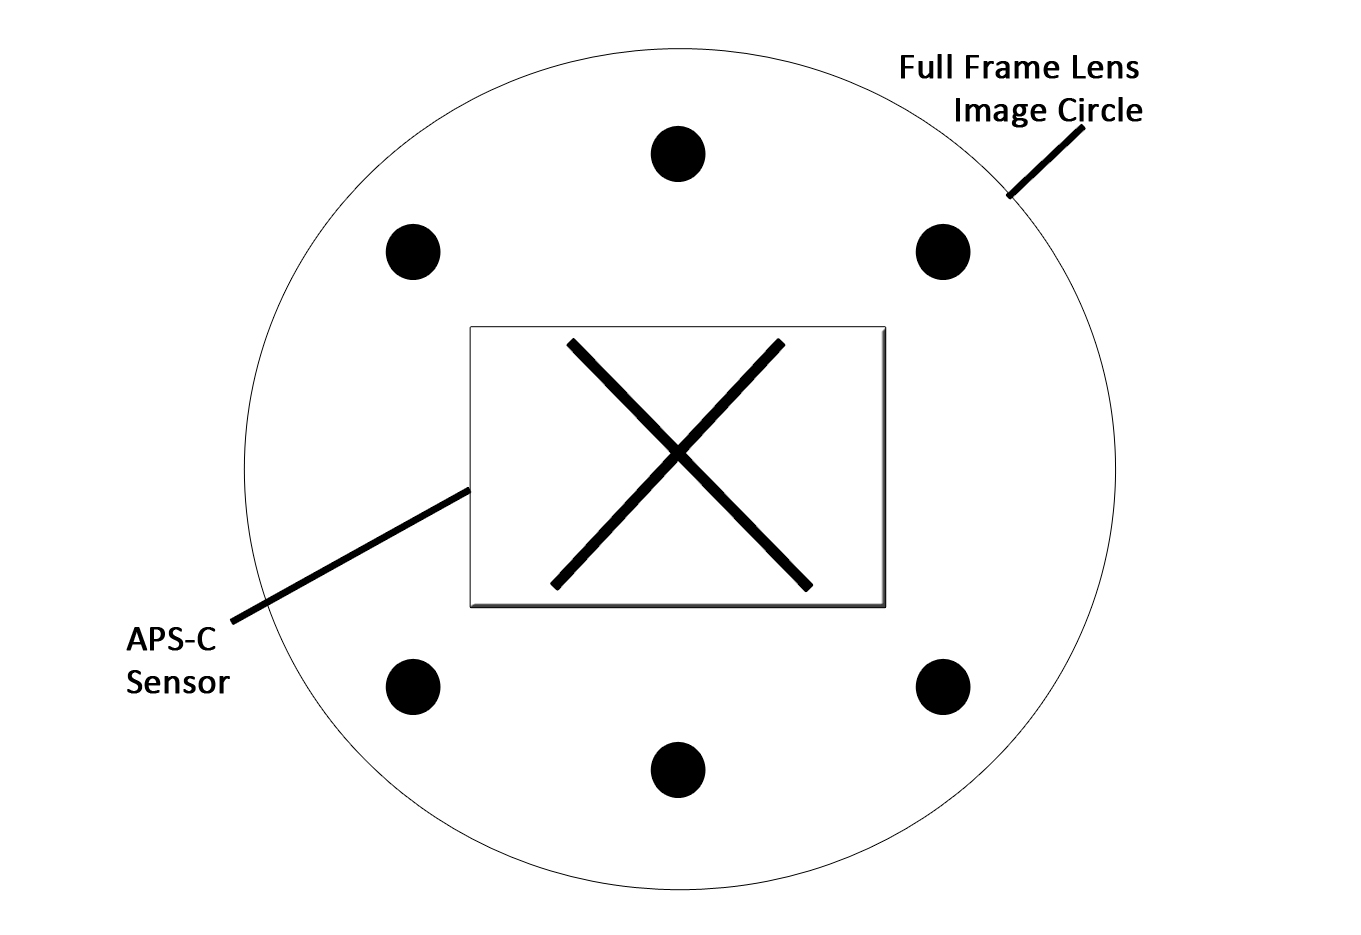
If that didn’t do it for you, here’s a scenario that might explain the difference between crop factor and image circle. Hopefully, the accompanying graphics will help:
1.  I have an APS-C sensor DSLR in front of me. I also have two lenses – both are 50 mm focal length, but one is designed for full frame and one is designed for digital-only. I have the camera set up on a tripod aimed at an object (X) which sits in the middle of the viewfinder. I try each of the lenses in turn and focus on the X. I notice that the X appears to be the same size in each case, and fills the frame from top to bottom. As long as the focal length on both lenses is the same, there is no change to the size of the image or the apparent angle of view in the captured image. The only difference is that the full frame lens is projecting a bigger image circle with more peripheral information (the dots) that the sensor doesn’t see anyway.
 
2.  I now take the full frame 50 mm lens and put it on a full frame sensor DSLR. The angle of view now appears wider than it did on the APS-C camera and the X is smaller (doesn’t fill the frame from top to bottom) by a factor of 1/1.6 (62.5%) because of crop factor in reverse. Saying it another way, the full frame lens now just covers the full frame sensor as opposed to the APS-C sensor which cropped the full frame lens image circle and caused apparent magnification. Again, focal length remained the same, but sensor size changed. Note that the full frame sensor captures some of the peripheral image (dots) that the APS-C sensor didn't.
 

3.  If I put the digital-only 50mm lens on the full frame camera (not generally possible as explained above), the object size is the same as in 2., but I see severe vignetting in the corners. This is because the image circle of the digital-only lens is too small for the full frame sensor.


To tie this discussion up with a nice ribbon, we can summarize where crop factor and image circle come into play as follows:
 
  • Crop factor is a consideration when using the same lens on two different cameras with different sensor sizes.
  • Image circle is a consideration when using two different lenses with the same focal length but different image circle sizes on the same camera.


Taking this one step further, what if you had a full frame DSLR, but you wanted to use a lens of the same focal length (ie. 50 mm) but with a bigger image circle than the full frame lens provided? Those of us geezers who used to use medium format film know that the lenses for those old cameras projected an even bigger image circle than full frame DSLR lenses because medium format film sizes were larger than a full frame sensor. So, as long as you were comfortable shooting in manual mode, you can adapt your medium format film lenses to your DSLR for reasonable cost. Why would you need a bigger image circle if the full frame lens covered your sensor? Well, with a bigger image circle, you can (with the right adapter) use tilt and shift functions over a wider range than you could with a full frame lens.

But tilting and shifting is another subject for another blog post….