Showing posts with label APS-C. Show all posts

Monday, 20 February 2017

Making Time Lapse Motion Capture of the Night Sky

In previous blog posts, I’ve written about taking still pictures of the night sky, and how to take time exposures in daylight. Now, let’s look at the ten basic steps for capturing the motion of the stars:

1.       Leave town. I typically drive 1 to 2 hours north of the city to get away from its ‘light dome’.

2.       Make sure you have a sturdy tripod for your DSLR.

3.       Use as wide-angle a lens as you can get. For a full frame sensor, consider using anywhere from 14mm to 18mm focal length. For APS-C sensors (ie. Canon Rebel or equivalent), a 10 to 12 mm focal length will work. Camera brand lenses can be outrageously expensive, so consider much cheaper but still good third party brands like Rokinon or Tokina.

4.       Consider getting an intervalometer, or at least a wired shutter release for your camera. Either one will cost you less than $20 on eBay.
Intervalometer


5.       If the air temperature is expected to drop below the dew point, be ready to clear condensation off your lens. You could use a microfibre cloth between shots, buy a battery operated fan at the dollar store to keep the air moving across the front of the lens, or look into some form of lens warmer.

6.       Set your ISO to about 3200 and your shooting mode to Manual. Since you want to keep exposure to less than 30 seconds to prevent the stars from creating noticeable trails on each frame you shoot, select a value between 20 and 30 seconds and set aperture to maximum (ie. f/2.8). I use f/4 with success, but it might force the choice of 30 seconds over 20 seconds. You may also want to use a fixed White Balance mode instead of Auto, but I generally have not found Auto to be a problem.

Normal Infinity Focus Setting
7.       If your lens has a focus scale, set it to the vertical bar near the infinity mark, but not at the infinity mark. Take a test shot and zoom in on the playback to see if you have optimal focus. If not, tweak it very slightly and re-check. The actual infinity focus point varies slightly with focal length, so leave the lens at your intended focal length when setting the focus point, and only zoom in on the playback to verify it.

8.       If using an intervalometer, set your camera to Bulb (may be found in Manual mode settings or may be a separate mode depending on the camera). Set the intervalometer shutter  ‘on’ time to 20 to 30 seconds (depending on your test shots), set its interval between shutter actuations to something like 5 seconds (to allow you to wipe condensation off the lens between shots), and set the number of frames to about 150. I normally shoot with RAW+JPEG, but you may want to consider doing such a long sequence in JPEG only to conserve memory card space. Elapsed time will be close to an hour and a half, so bring a coffee flask!

9.       If using a simple wired shutter release, set the camera to burst or continuous mode instead of single shot mode. You will not use Bulb mode in this case. Instead, select either 20 or 30 seconds for your shutter speed in Manual mode. When ready to start, use the lock on the wired release to hold the shutter button on. The camera will take one shot immediately after the other with no breather in between. This will get the sequence over with more quickly than when using an intervalometer with a 5 second breather, but you won’t have an opportunity to clean off condensation between shots. Depending on the camera, you may also have to manually keep track of the number of shots taken.

10.   Find an interesting object on earth that you can anchor your shots to. Put it in the lowe part of your frame, about a third of the way in from the edge. You can have it silhouette against the sky, or use a flashlight to do a little light painting. In a sequence, however, you may want to forget the light painting because it is difficult to make the object look uniformly lit in all 150 or so frames. Now, consider putting Polaris somewhere in your shots, so you can see the stars rotate around it in your final sequence.

That takes care of the capture portion. Now for the post-production steps:

1.       I import all 150 frames (images) into Lightroom. Then, if corrections for exposure, white balance, etc. are needed, you can make the changes to one frame and sync the changes to all 150. Similarly, I have set up a custom crop mode in Lightroom for 16x9, so that the resultant video will frame properly on television. Again, I can crop one and sync-crop all the others.

2.       A sidebar on ‘stuck’ pixels: You are going to notice that there will be bright spots on all frames, which don’t move with the stars. These are generally due to the long exposures and the number of such exposures, which result in heating up of the sensor. If these are left alone, it will look weird once you put all the stars in motion, since stuck pixels don’t move. You could use the camera’s long exposure noise reduction feature to mitigate this, but you will be out there for three hours instead of one and a half hours capturing the 150 frames. My approach is to use the clone brush in Lightroom on one frame and sync to all other frames.This is the most time-intensive and frustrating part of the process due to thenumber of stuck pixels my camera produces, and the way you clone them out may adversely affect other frames once you sync. There is a bit of an art to it, and I could write a whole treatise on it. But not now.

3.       Once I’ve cleaned up all the frames, I export them from Lightroom as TIFF files. At this point, you may want to decide if you simply want to make a video clip of the stars rotating around Polaris, or create progressively longer and longer star trails as they rotate. For the latter, you could use StarStax. This software creates another set of files in which the star trails get progressively longer. This is done by ticking a checkbox in the settings menu to force it to save a file every time it adds another file to the sequence. If you don’t check the box, it will only create one file that consists of all 150 frames forming a single long trail for each star.

4.       Now to put things in motion. There are a number of software packages that can accomplish this, but I use my Corel VideoStudio video editor. In that software, you simply right-click on an empty timeline and select the time lapse option(‘Insert Photo for Time-lapse/Strobe’). You then tell it where your frames are and how long you want to make the clip (I generally start with about 10 seconds), and the frames load onto the timeline. If you want to have the stars rotate without making trails, use the files you exported out of Lightroom. On the other hand, if you want the stars to create progressively longer star trails, use the files created by StarStax.


5.       Now you can create a finished video (Share tab in Corel). I prefer to save mine in .mp4 format. Have a look at my two samples on YouTube. One is without StarStax (Milky Way video) and the other is with StarStax (observatory video).  I hope these inspire you to try out this fun technique.


Sunday, 24 February 2013

Lenses for the DSLR: Crop Factor and Image Circles


(Not to be confused with crop circles)
 
A few months ago, I wrote about how sensor size affects the way different cameras capture an image when using the same lens. To refine the topic a bit further, I’m going to introduce two terms: crop factor and image circles.
Why bother with this techno-babble? Well, as stated in the earlier article, if you now own a consumer DSLR with an APS-C sized sensor, chances are that when you want to replace it down the road, your next camera will have a full frame sensor. This means that the lenses you have now are going to behave differently on your future camera, or, worst case, will force you to buy at least one new lens.
Now for my definitions:

Crop Factor – The ratio of apparent magnification provided by the same lens when switching between two different-sized camera sensors.

For example, a lens on an APS-C sized sensor will produce an image that appears magnified by a factor of 1.6 times over the image captured by that same lens on a full frame sensor. The actual image projected by the lens is the same in both cases (note that the focal length of the lens is assumed to be fixed), but the smaller APS-C sensor sees fractionally less of the projected image than the full frame sensor. In effect, the APS-C sensor is ‘cropping’ the image, thereby giving the impression that it is magnifying part of the image.

Image Circle – The diameter of a circular image projected by a lens when focused on a surface. It is usually expressed in millimetres.

In this context, the lens is projecting the image from a scene in front of the camera onto the back of the camera. At the back of the camera is the sensor. In order for the image to fully cover the sensor, the image circle must be at least as large as the diagonal measurement of the sensor. Otherwise, we would see a darkening in the corners of the resulting image where the projected image didn’t fully cover the sensor. This is called vignetting.

One important fact to note is that lens manufacturers make two different types of lenses for DSLRs: full frame and digital-only. For example, Canon full frame lenses are designated EF and digital-only are designated EF-S. They may have exactly the same focal length, but the difference is that the full frame version projects a bigger image circle, more than sufficient to cover the full frame sensor. The full frame version works fine on both full frame and APS-C cameras, whereas the digital-only version would cause vignetting on the full frame camera. Note: while the mounts look the same on the EF and EF-S lenses, there is a protruding 'shoulder' on the EF-S lenses that prevents you from mounting them on full frame cameras.
Now, you would be tempted to think that using a full frame lens on an APS-C sensor when compared with the digital-only lens would result in apparent magnification, just like the crop factor, because the smaller sensor is only capturing part of the full frame lens image circle. An important difference, however, is that if you looked at the projected images from the full frame and digital-only lenses (with the same focal length) under the exact same conditions, an object in the scene would be projected at exactly the same size. Why? - because the full frame lens actually captures a wider field of view. In other words, putting the full frame lens on an APS-C camera will project peripheral information outside of the sensor, while the digital-only lens will not project that peripheral information but will adequately cover the sensor.

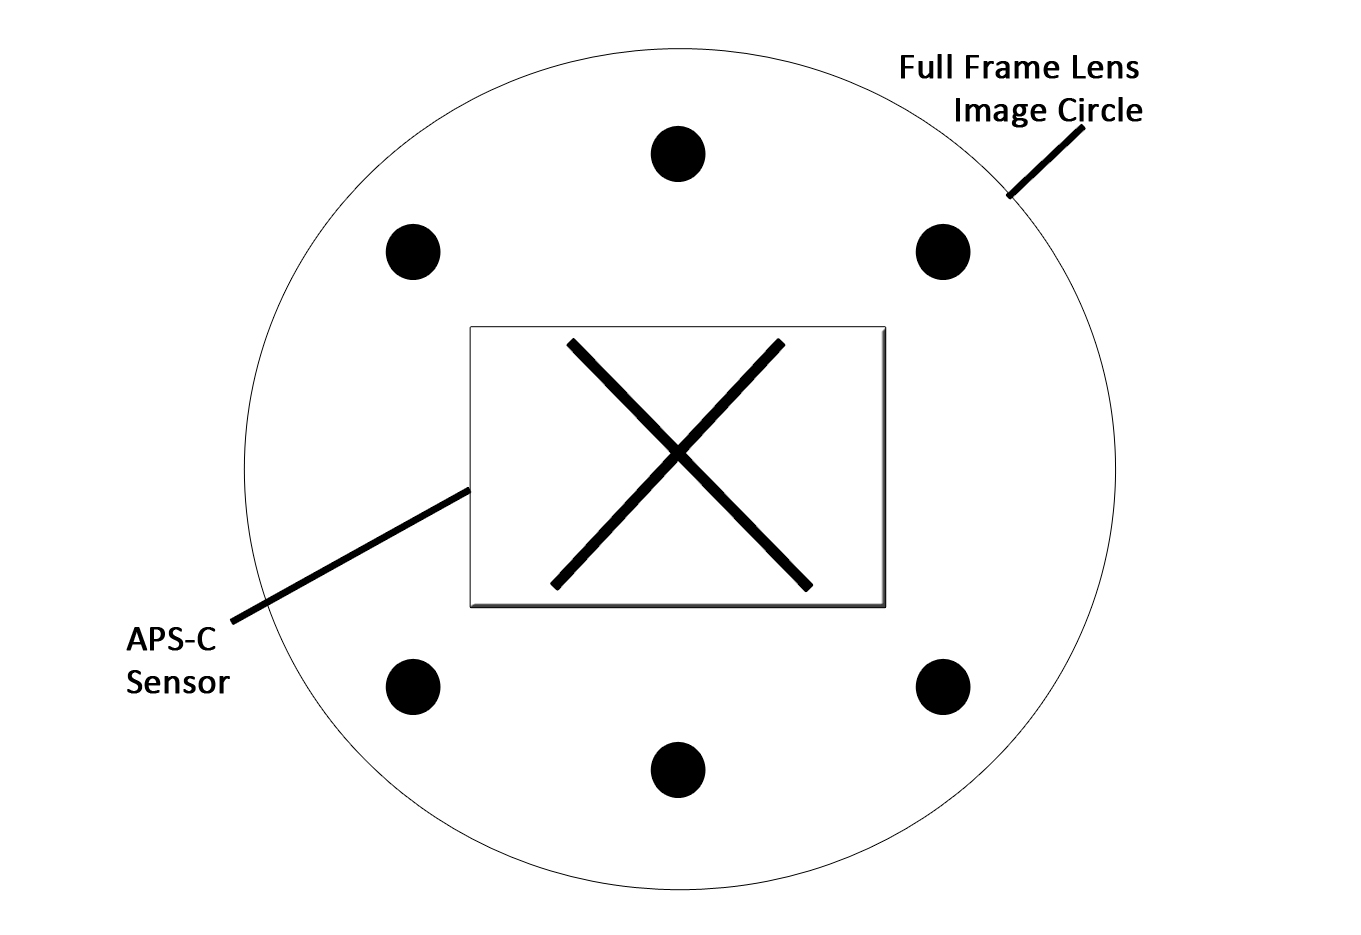
If that didn’t do it for you, here’s a scenario that might explain the difference between crop factor and image circle. Hopefully, the accompanying graphics will help:
1.  I have an APS-C sensor DSLR in front of me. I also have two lenses – both are 50 mm focal length, but one is designed for full frame and one is designed for digital-only. I have the camera set up on a tripod aimed at an object (X) which sits in the middle of the viewfinder. I try each of the lenses in turn and focus on the X. I notice that the X appears to be the same size in each case, and fills the frame from top to bottom. As long as the focal length on both lenses is the same, there is no change to the size of the image or the apparent angle of view in the captured image. The only difference is that the full frame lens is projecting a bigger image circle with more peripheral information (the dots) that the sensor doesn’t see anyway.
 
2.  I now take the full frame 50 mm lens and put it on a full frame sensor DSLR. The angle of view now appears wider than it did on the APS-C camera and the X is smaller (doesn’t fill the frame from top to bottom) by a factor of 1/1.6 (62.5%) because of crop factor in reverse. Saying it another way, the full frame lens now just covers the full frame sensor as opposed to the APS-C sensor which cropped the full frame lens image circle and caused apparent magnification. Again, focal length remained the same, but sensor size changed. Note that the full frame sensor captures some of the peripheral image (dots) that the APS-C sensor didn't.
 

3.  If I put the digital-only 50mm lens on the full frame camera (not generally possible as explained above), the object size is the same as in 2., but I see severe vignetting in the corners. This is because the image circle of the digital-only lens is too small for the full frame sensor.


To tie this discussion up with a nice ribbon, we can summarize where crop factor and image circle come into play as follows:
 
  • Crop factor is a consideration when using the same lens on two different cameras with different sensor sizes.
  • Image circle is a consideration when using two different lenses with the same focal length but different image circle sizes on the same camera.


Taking this one step further, what if you had a full frame DSLR, but you wanted to use a lens of the same focal length (ie. 50 mm) but with a bigger image circle than the full frame lens provided? Those of us geezers who used to use medium format film know that the lenses for those old cameras projected an even bigger image circle than full frame DSLR lenses because medium format film sizes were larger than a full frame sensor. So, as long as you were comfortable shooting in manual mode, you can adapt your medium format film lenses to your DSLR for reasonable cost. Why would you need a bigger image circle if the full frame lens covered your sensor? Well, with a bigger image circle, you can (with the right adapter) use tilt and shift functions over a wider range than you could with a full frame lens.

But tilting and shifting is another subject for another blog post….


Wednesday, 7 November 2012

Size matters – in sensors, that is.


When digital SLRs started to come into the market, they essentially replaced the 35mm film camera. In most cases, the lenses that fit your 35mm camera could now be used on the new digitals (from the same manufacturer, of course) without the need for any adapters. Sweet.

Those who made this transition noticed something right away. The 50mm focal length lens that gave a ‘normal’ angle of view on their film camera now acted like an 80mm lens, or slight telephoto, when attached to the digital SLR. In other words, the image was now magnified compared to using the same lens on the 35mm camera.

In some ways this was a benefit, because it meant that the telephoto lens you bought for your 35mm camera now reached a bit further on the digital SLR– about 1.6 times further. The downside was that the wide angle lens that used to work beautifully for landscapes on your 35mm wasn’t so wide anymore on the digital.

This difference is attributable to the size of the sensor in the digital camera. Most consumer SLRs use an APS-C size sensor, which is 22mm x 15mm. Compare that to 35mm film at 36mm x 24mm. Given the same lens projecting the same ‘image circle’ on the digital sensor  and the 35mm negative, the digital sensor only captures part of what the negative captures. Essentially, the digital image is magnified (by 1.6 times) since it’s like zooming in on a small part of the image circle.

For years now, professionals who could afford it have been using full frame digital SLRs (example – the Canon 5D) which use a 36mm x 24mm sensor, just like the 35mm negative size. While the manufacturers could have stuffed more pixels into this bigger sensor (and did so to an extent), the big benefit is that they can now make the pixels bigger.

Why? The bigger the pixel, the more light it can gather, meaning the camera will yield less ‘noise’ in the image in low light situations. Overall, the image is cleaner and yes, at a somewhat higher resolution. In fact, Nikon recently introduced the full frame D800 with an astonishing 36 megapixel sensor. Compare that to the Canon 5D’s 22 megapixel resolution or 18 megapixels on most consumer SLRs. Of course, file sizes bloom with higher resolution.

All of this is significant because the prices of full frame camera bodies are starting to slide below the $2000 price point. While APS-C and other similar size sensors kick-started the digital photography revolution, affordable full frames will eventually bring it full circle. The smaller sensors won’t disappear for a while yet, but those of us who came up through the film world will once again be able to shoot the way we used to – only with the immediacy of digital and a moderate size hole in our pocket.